External Embedding
Embedding for Customers and Partners
External embedding enables delivering data to users outside of the business, living in other applications. Reporting can be mapped to row level permissions, allowing many users to access identical reports filtered to only their own data.
Embedding with SSO (single-sign on) works by creating an authorized Omni URL that you will use in an iframe. The URL contains the content you want to share, the ID of the user in your system, and the attributes you want that user to have. You'll then sign the URL with a secret key provided by Omni.
Embed Content Requirements
If the content you are trying to embed meets any of the following criteria...
- content that contains fields not modeled in a topic
- content that is built on sql
- content that is saved in your personal folder (the content must be in the shared hub)
- content that contains changes to the workbook model's joins which have not been merged or promoted
...then your embdedded dashboard will not render appropriately.
It is important to consider the sharing role assigned to the content you are planning to embed. By default, Omni assigns a Viewer content sharing role to embedded content. This restricts embed users to only view dashboard content that is modeled in a topic. Any content (dashboard tiles) that is not bound to a topic or is SQL-based will not be visible to embed users.
Warning: Proceed with Caution
In the event that you do want to expose SQL-based or non-topic bound content your embed users, it is possible to accomplish this by enabling the "AccessBoost" role on the sharing settings for that piece of content. This has security implications - you may be exposing data to your embed users that you may not want them to see.
Build an Embed URL
Omni embed URLs are composed of a few parts. These parts are concatenated into a single string and signed with a unique secret key used only by your organization. The signature is then added to a url with all the parts specified as query parameters in the URL. When an Omni server receives the request in the URL, we will attempt to generate the same signature. If the passed in signature matches the signature generated in our servers, the request is honored.
Generating a URL using an SDK (Recommended)
Generating a signed URL is complex and error prone. It is highly recommended you use an example script to generate embed URLs.
Omni has a supported Typescript SDK and some unsupported examples in other languages. Overtime the supported libraries will expand:
Supported:
Unsupported:
Embed URL Builder
Use the URL Builder in your Admin > Embed settings to test generating what your URLs should look like.
URL Builder Parameters
| Parameter Name | Required Status | Description | Example Input(s) |
|---|---|---|---|
| Content Path | Required | Path pointing to the content you wish to build a URL to embed. | /embed/dashboards/_t58Abc |
| External ID | Required | Required parameter creating a unique ID. This can be any alphanumeric value. | sugar, &spice123 or 123+EveryThingNice |
| Name | Required | Required parameter and can contain a non-unique name for the embed user's name property. | Bubbles Power, Buttercup Puff or Blossom Girls |
| User Attributes | Optional | Reference which user attributes you want applied to this particular embed user. | {"country":"Townsville", "associated_ids":[9,10,11]} |
| Filter Search Param | Optional | Specify which filters to apply for this embedded content. | f--order_items.status=closed |
| Link Access | Optional | Allows you to customize which other Omni dashboards can be linked to from the embedded dashboard. | Input __omni_link_access_open for all links on the embedded dashboard to be permissed and shown; input a list of dashboard IDs: abcd1234,efgh5678,ijkl9999 to only permit those specific dashboard IDs to be shown; leave the parameter blank for all links to other Omni dashboards links to be restricted; Note that links to anything other than an Omni Dashboard will be shown and permissed regardless of the values spcified in the linkAccess parameter. |
| Custom Theme | Optional | Allows you to stylize your embedded dashboard to your preferred colors. | Check out custom theme example input here |
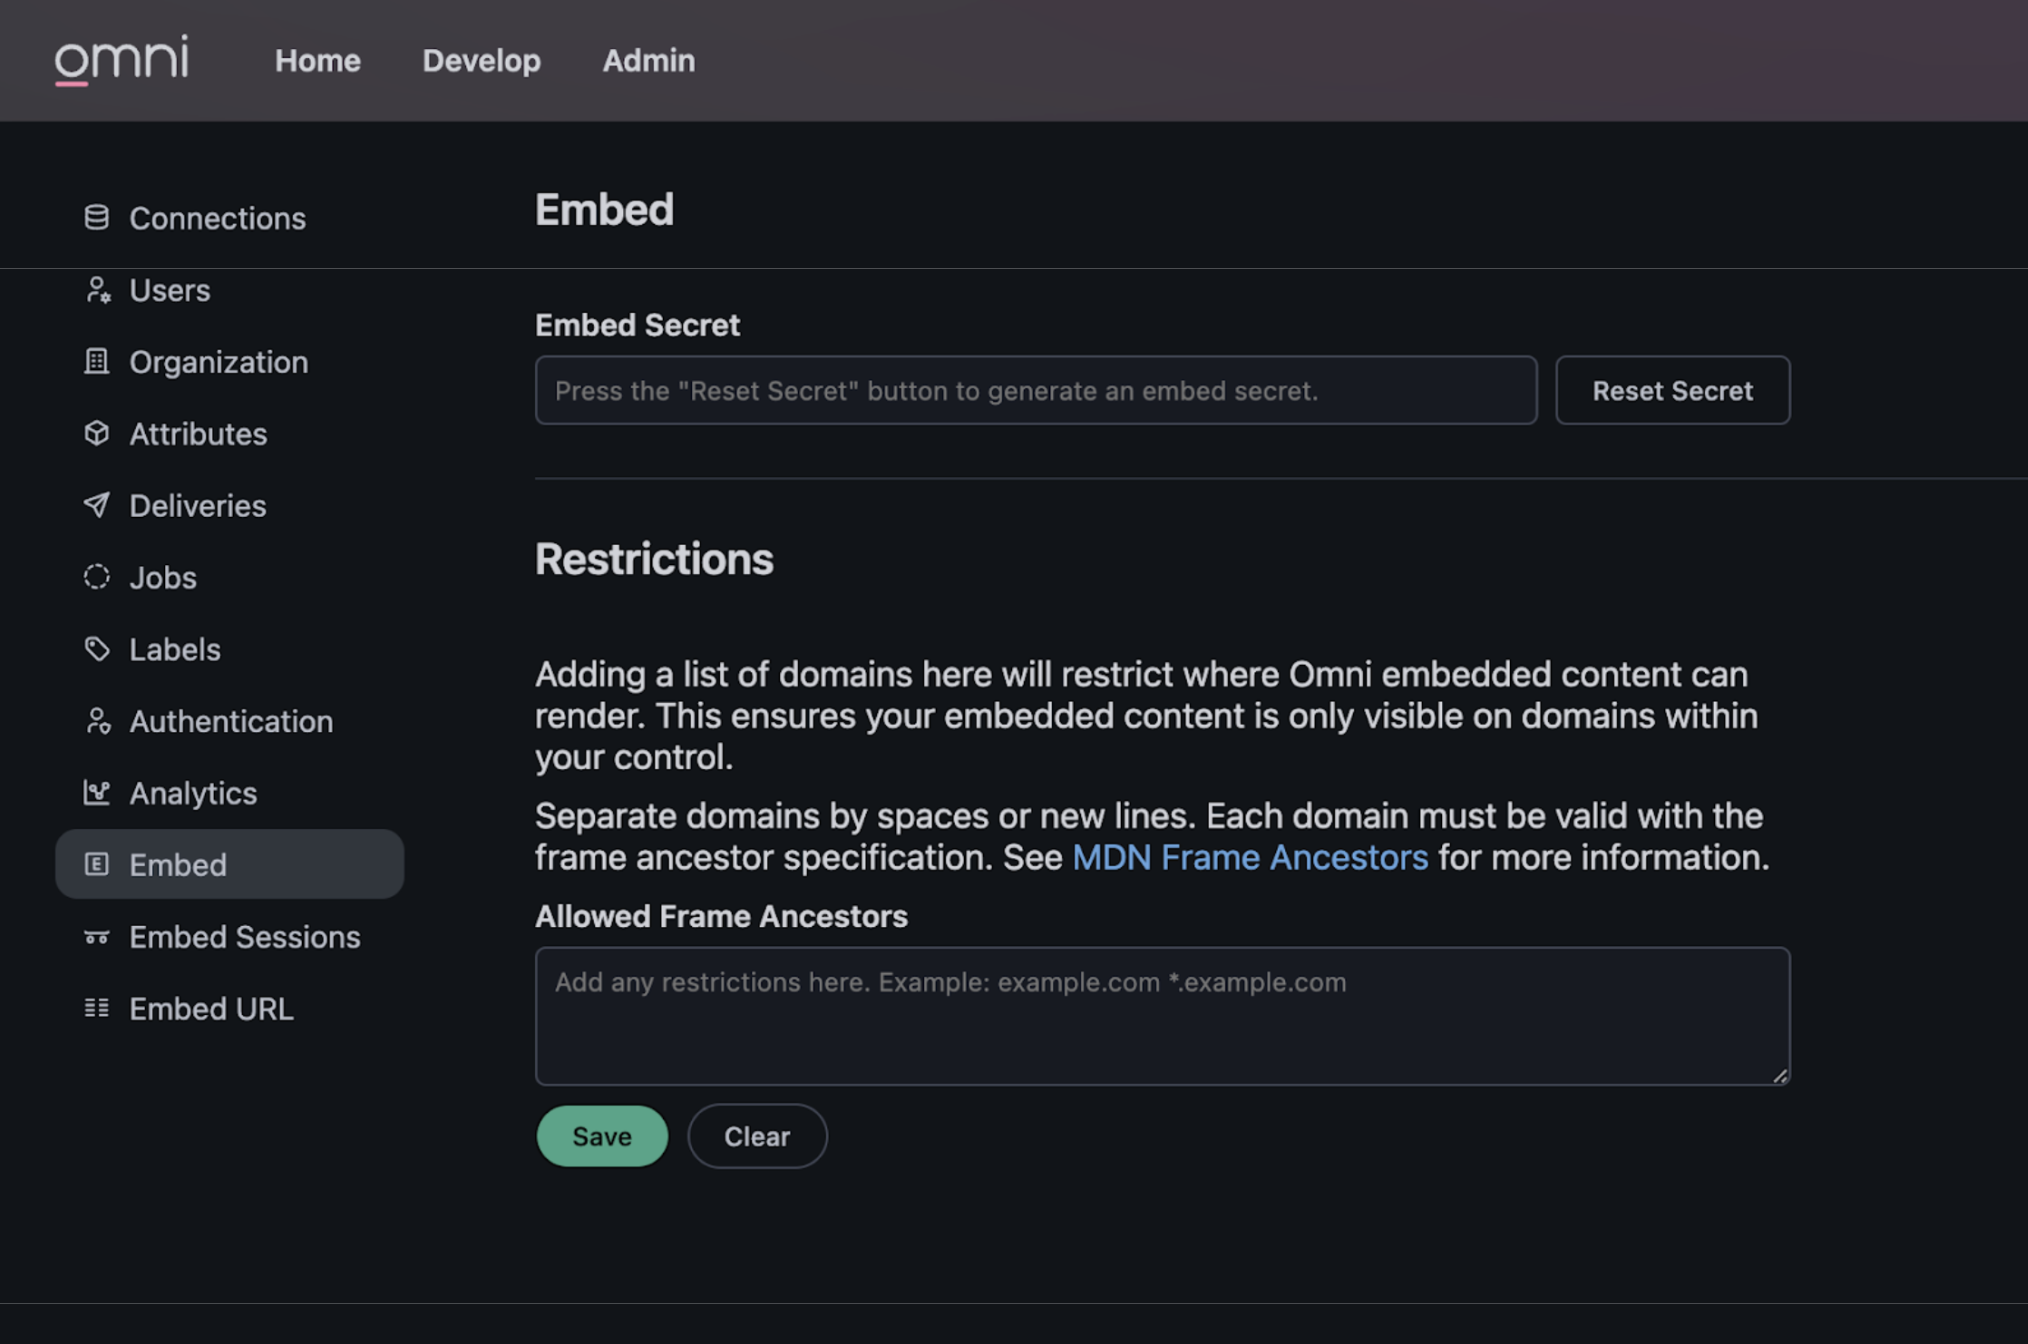
Generating a secret
Generate a secret by going to the Admin > Embed section of your Omni instance.
Press the “Reset Secret” button to generate your random secret key. Resetting an existing secret key will invalidate the previous one, so be sure to update any scripts with the latest secret.
Embed URL Customization Options
Use a Vanity Domain
🪞 You may want to implement the use of a vanity domain for your embedded dashboards if you need to utilize first-party cookies or would like to have cohesive branding of the content you share with your clients.
- 🔥 Tips
- SDK Example
- This feature is only available for private embed use cases.
- Only one vanity domain is allowed per Omni organization.
- Have a multi-part domain like products.ecommerce.com or dev.products.ecommerce.com.
Vanity Domain: products.ecommerce.com
const iframeUrl = await embedSsoDashboard({
  contentId: "miU0hL6z",
  externalId: "wile.e@coyote.co",
  name: "Wile E",
  organizationName: "products",
  domain: "ecommerce.com"
  secret: "abcdefghijklmnopqrstuvwxyz123456",
});
Note: Your SDK must have the domain: parameter in addition to the organizationName: parameter in order to properly generate the embed URL.
How to...
-
📧 Start this process by reaching out to support@omni.co with the following information:
-
Provide the vanity domain you are interested in, e.g. products.ecommerce.com
-
Key considerations:
- Note that a vanity domain must have three, or more, parts like the example above - ecommerce.com without “products” prepended will not be considered a valid vanity domain.
- The top level domain of the vanity domain must match the embedding page to support first party cookies.
- If your embedding page is ecommerce.com, then your embedded vanity domain should be omni.ecommerce.com
- If your embedding page is ecommerce.com and you provide an embedded vanity domain of ecommerce.omni.com then you may still run into third-party cookie limitations on some browsers like Safari or other iOS applications.
-
-
Your dedicated Omni team will reach back out with DNS configuration details and ask that you update your DNS configuration.
-
Once confirmed it is updated with Omni, the team can complete the next configuration steps.
-
Your Omni team will let you know once all of the settings are enabled and ready for you to start rocking that vanity domain 🤘
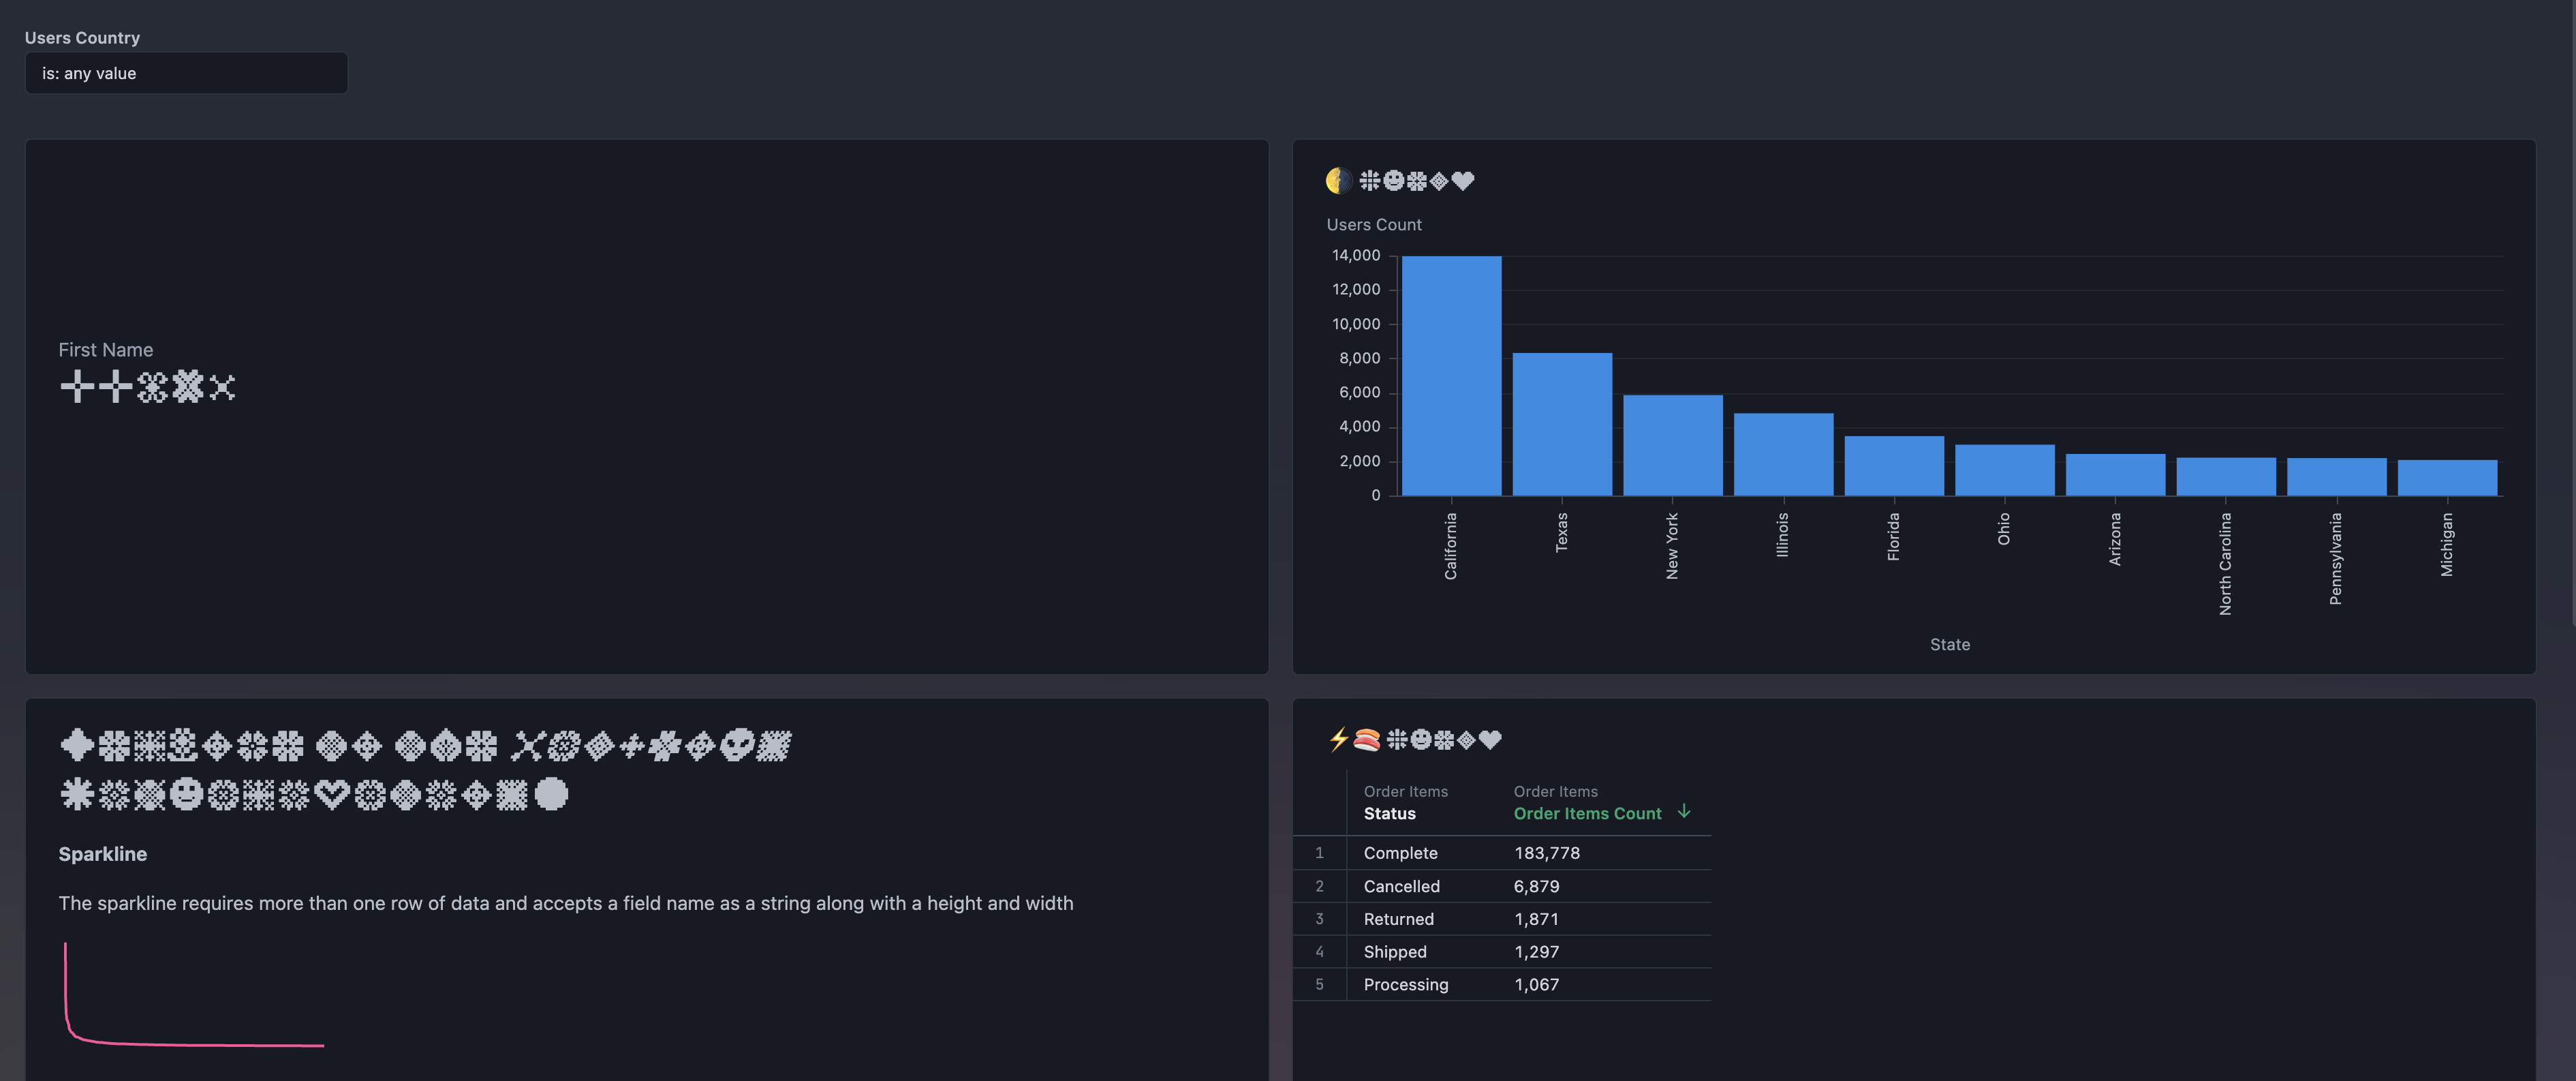
Custom Themes
🎨 Custom theming provides greater flexibility in embedded dashboard customization. It allows users to customize various dashboards stylings like background gradients and border radius stylings.
A custom theme can be applied to an embedded dashboard by passing a custom theme object to an embed URL's customTheme parameter.
For testing purposes, you can use the "Custom Theme" input in the Admin > Embed > URL Builder section as seen in the Custom Theme URL Builder tab below.
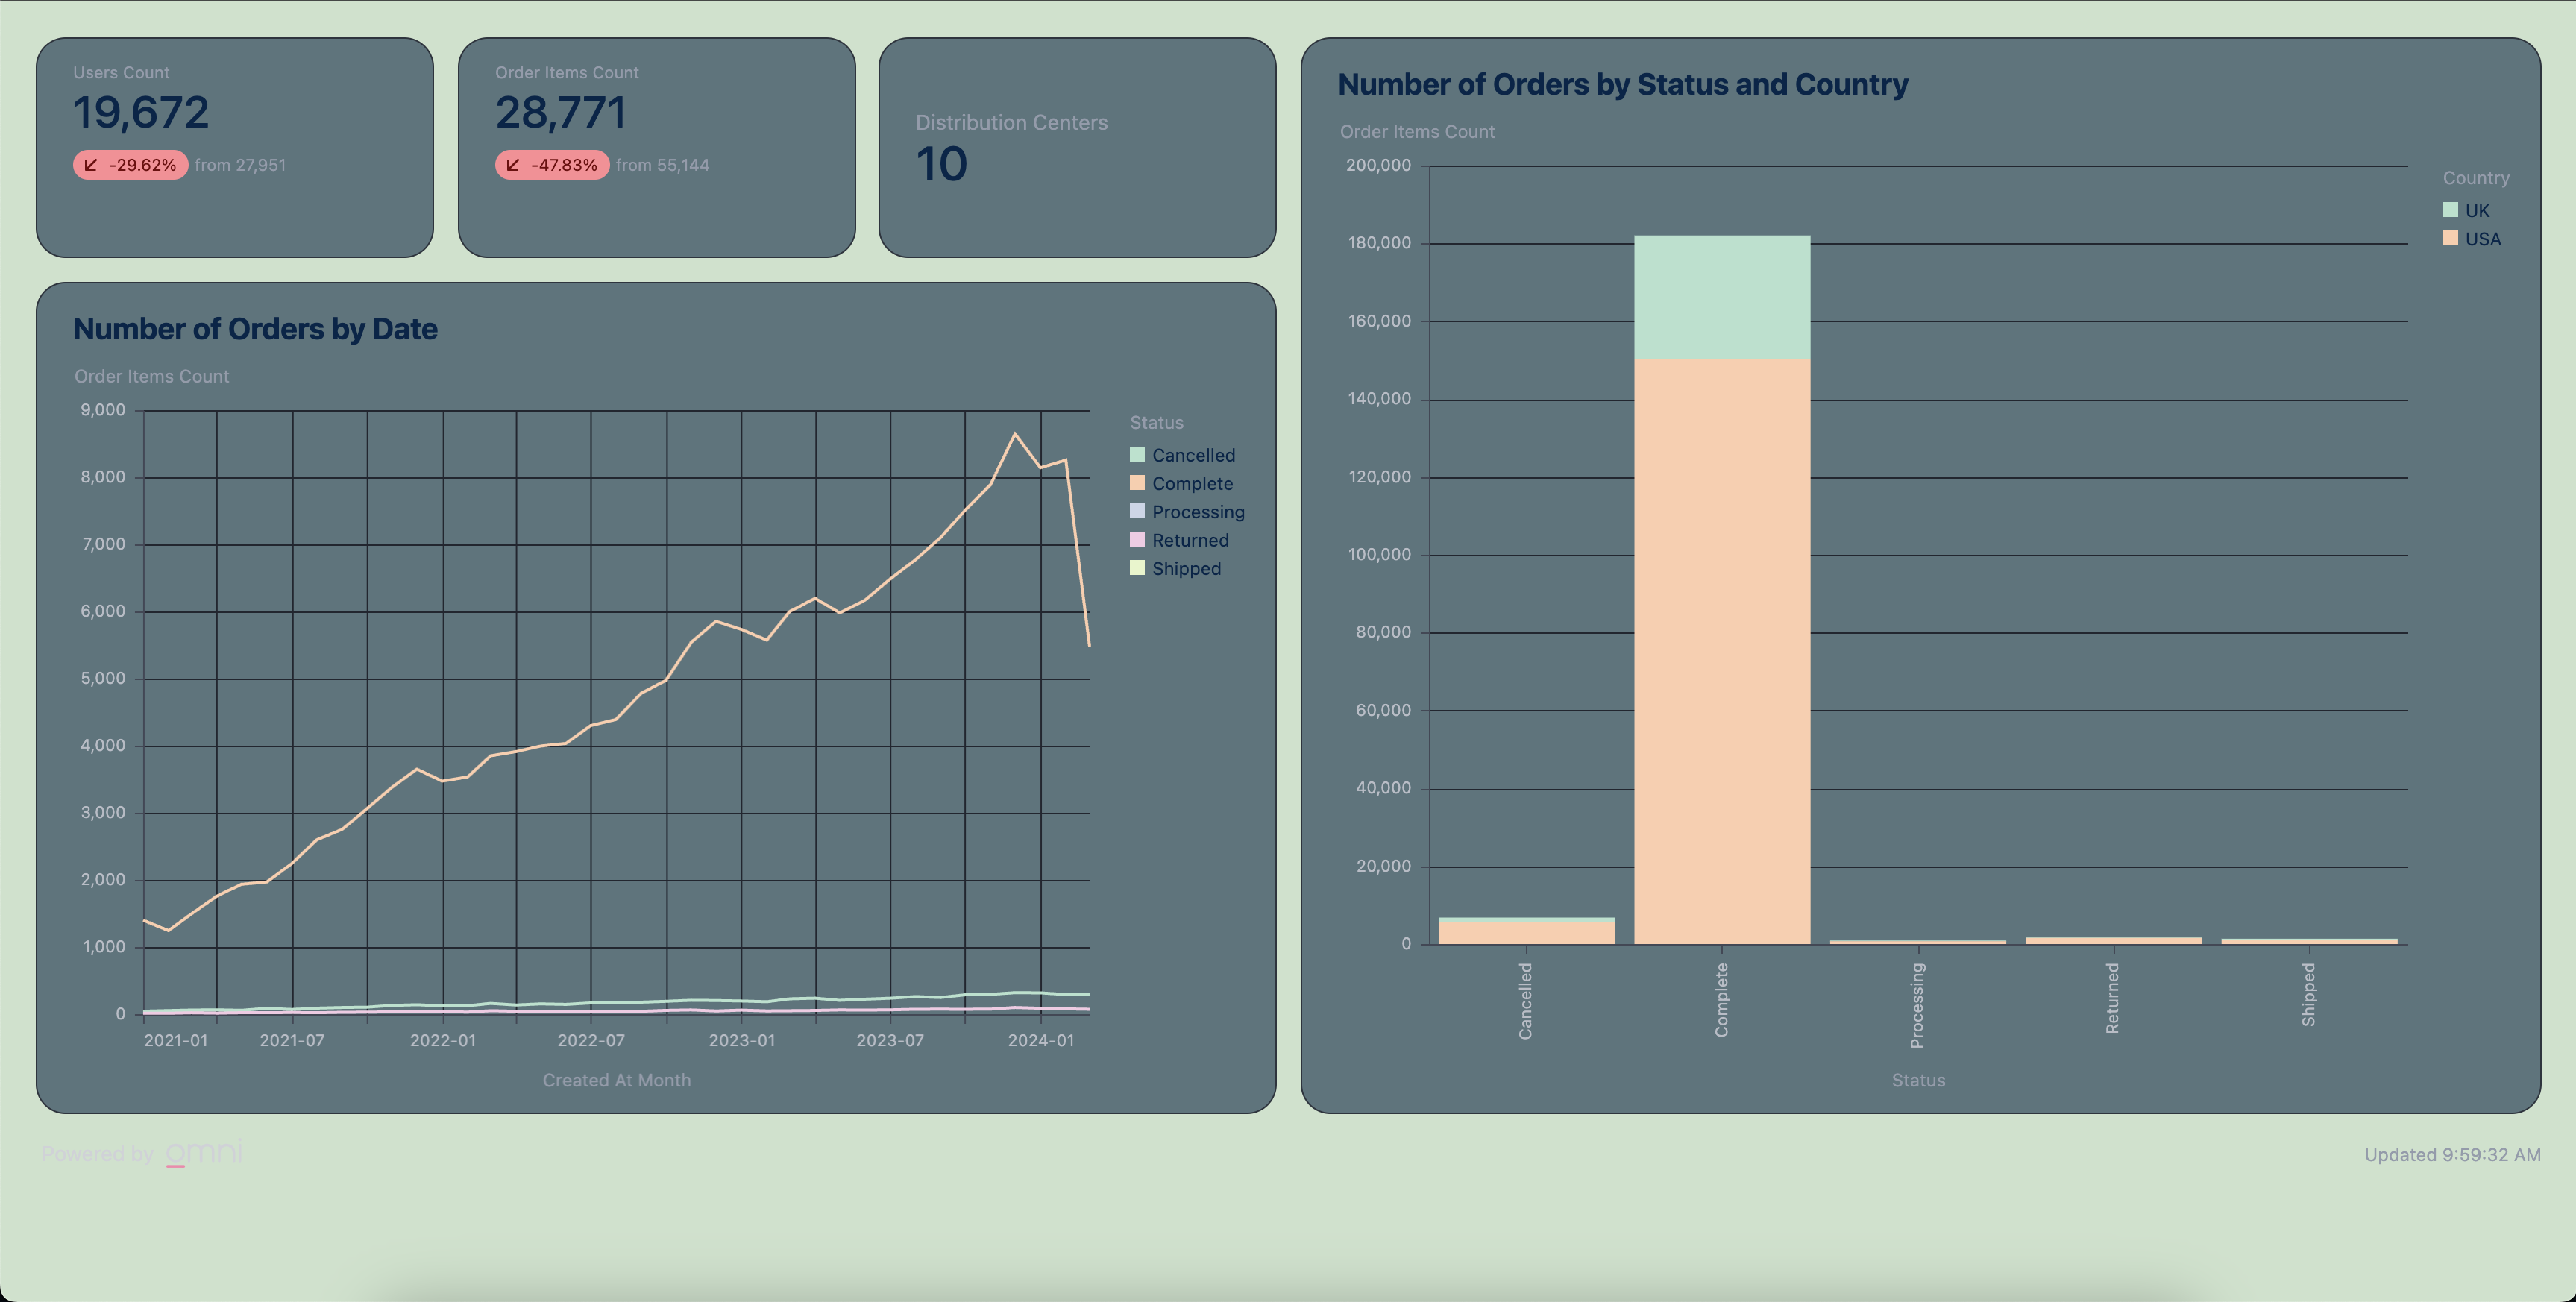
- Custom Theme Dashboard Example
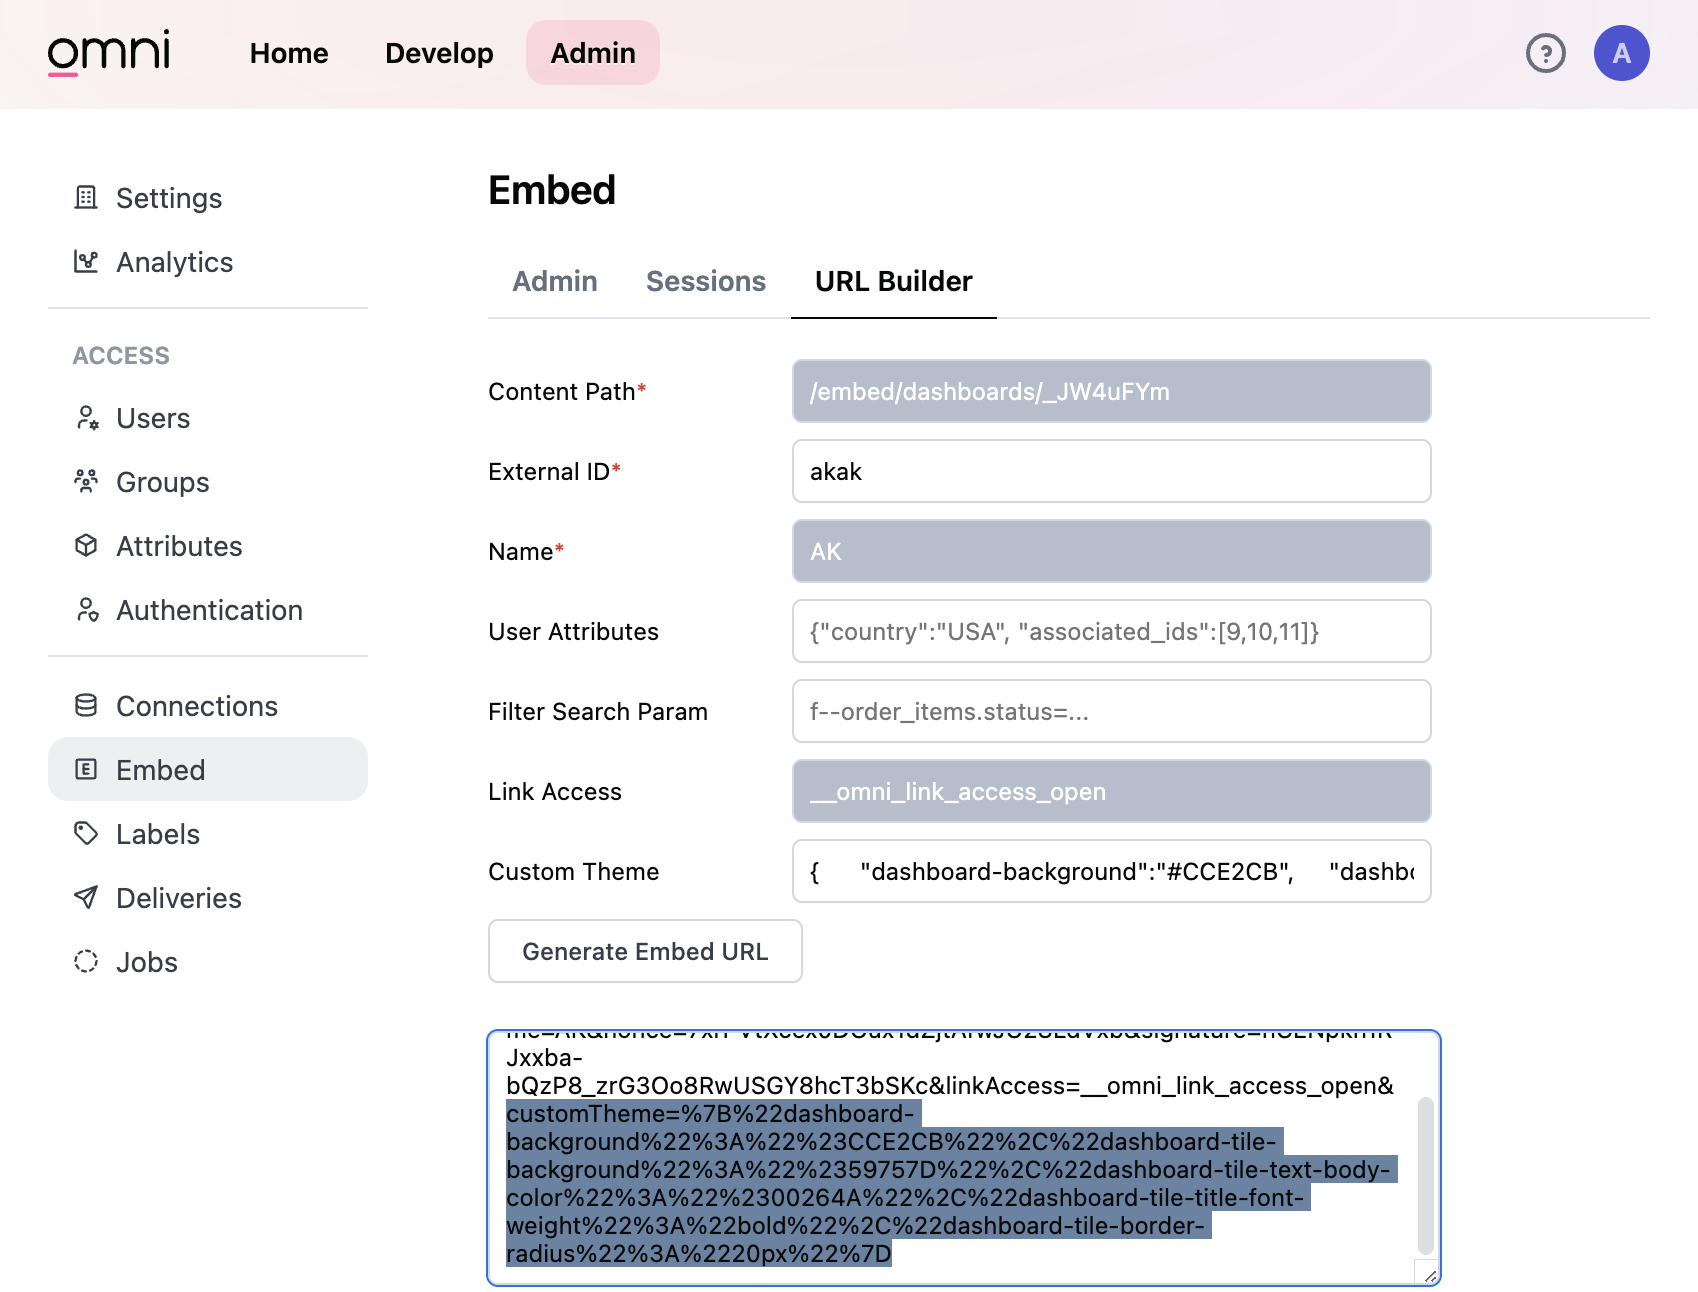
- Custom Theme URL Builder
- Custom Theme Code Example
- Navigate to the Admin settings > Embed page > URL Builder tab
- Input the required and desired parameters to generate your embed URL
- Use the Custom Theme Code Example in the next tab to see how to format the Custom Theme parameter input.
- And voilà! Generate your URL and see your snazzy, customized dashboard ✨
{
    "dashboard-background":"#CCE2CB",
    "dashboard-tile-background":"#59757D",
    "dashboard-tile-text-body-color":"#00264A",
    "dashboard-tile-title-font-weight":"bold",
    "dashboard-tile-border-radius":"20px"
}
Custom Theme Properties
The following properties can be added to an embed login URL's customTheme parameter to customize the embedded dashboard appearance:
| Property Name | Description |
|---|---|
| dashboard-background | The background color of the embedded dashboard. Any valid CSS "background" property value is acceptable. |
| dashboard-tile-background | The background color of the embedded dashboard's tiles. Any valid CSS "background" property value is acceptable. |
| dashboard-tile-text-body-color | The text color of primary text in the embedded dashboard's tiles. Primary text refers to the tile title of most tiles or the single value of single value tiles. |
| dashboard-tile-text-secondary-color | The text color of secondary text in the embedded dashboard's tiles. Any valid CSS "color" property value is acceptable. |
| dashboard-tile-border-color | The border color of the embedded dashboard's tiles. Any valid CSS "color" property value is acceptable. |
| dashboard-tile-border-radius | The border radius of the embedded dashboard's tiles. Any valid CSS "border-radius" property value is acceptable. |
| dashboard-tile-border-style | The border style of the embedded dashboard's tiles. Any valid CSS "border-style" property value is acceptable. |
| dashboard-tile-border-width | The border width of the embedded dashboard's tiles. Any valid CSS "border-width" property value is acceptable. |
| dashboard-tile-title-font-size | The font size of the embedded dashboard tiles' titles. Any valid CSS "font-size" property value is acceptable. |
| dashboard-tile-title-font-weight | The font weight of embedded dashboard tiles' titles. Any valid CSS "font-weight" property value is acceptable. |
| dashboard-tile-title-text-color | The text color of title text in the embedded dashboard's tiles. Any valid CSS "color" property value is acceptable. |
| dashboard-tile-title-font-family | The font family of title text in the embedded dashboard's tiles. To use a custom font, pass a link to a remote woff2 file. |
| dashboard-tile-text-body-font-family | The font family of body text in the embedded dashboard's tiles. To use a custom font, pass a link to a remote woff2 file. |
| dashboard-tile-text-code-font-family | The font family of a markdown <code> element in the embedded dashboard's markdown tiles. To use a custom font, pass a link to a remote woff2 file. |
| dashboard-key-color | The key color of the embedded dashboard. Used on filter "Update" buttons and other key elements. |
| dashboard-key-text-color | The key text color of the embedded dashboard. Used on the text of filter "Update" buttons and other key elements. |
Getting woff2 file links from Google Fonts
Font family properties like dashboard-tile-title-font-family support links to a remote woff2 file. A typical use case is to link to a woff2 file from a Google Font. To grab the link to a Google Font woff2 file, perform the following steps:
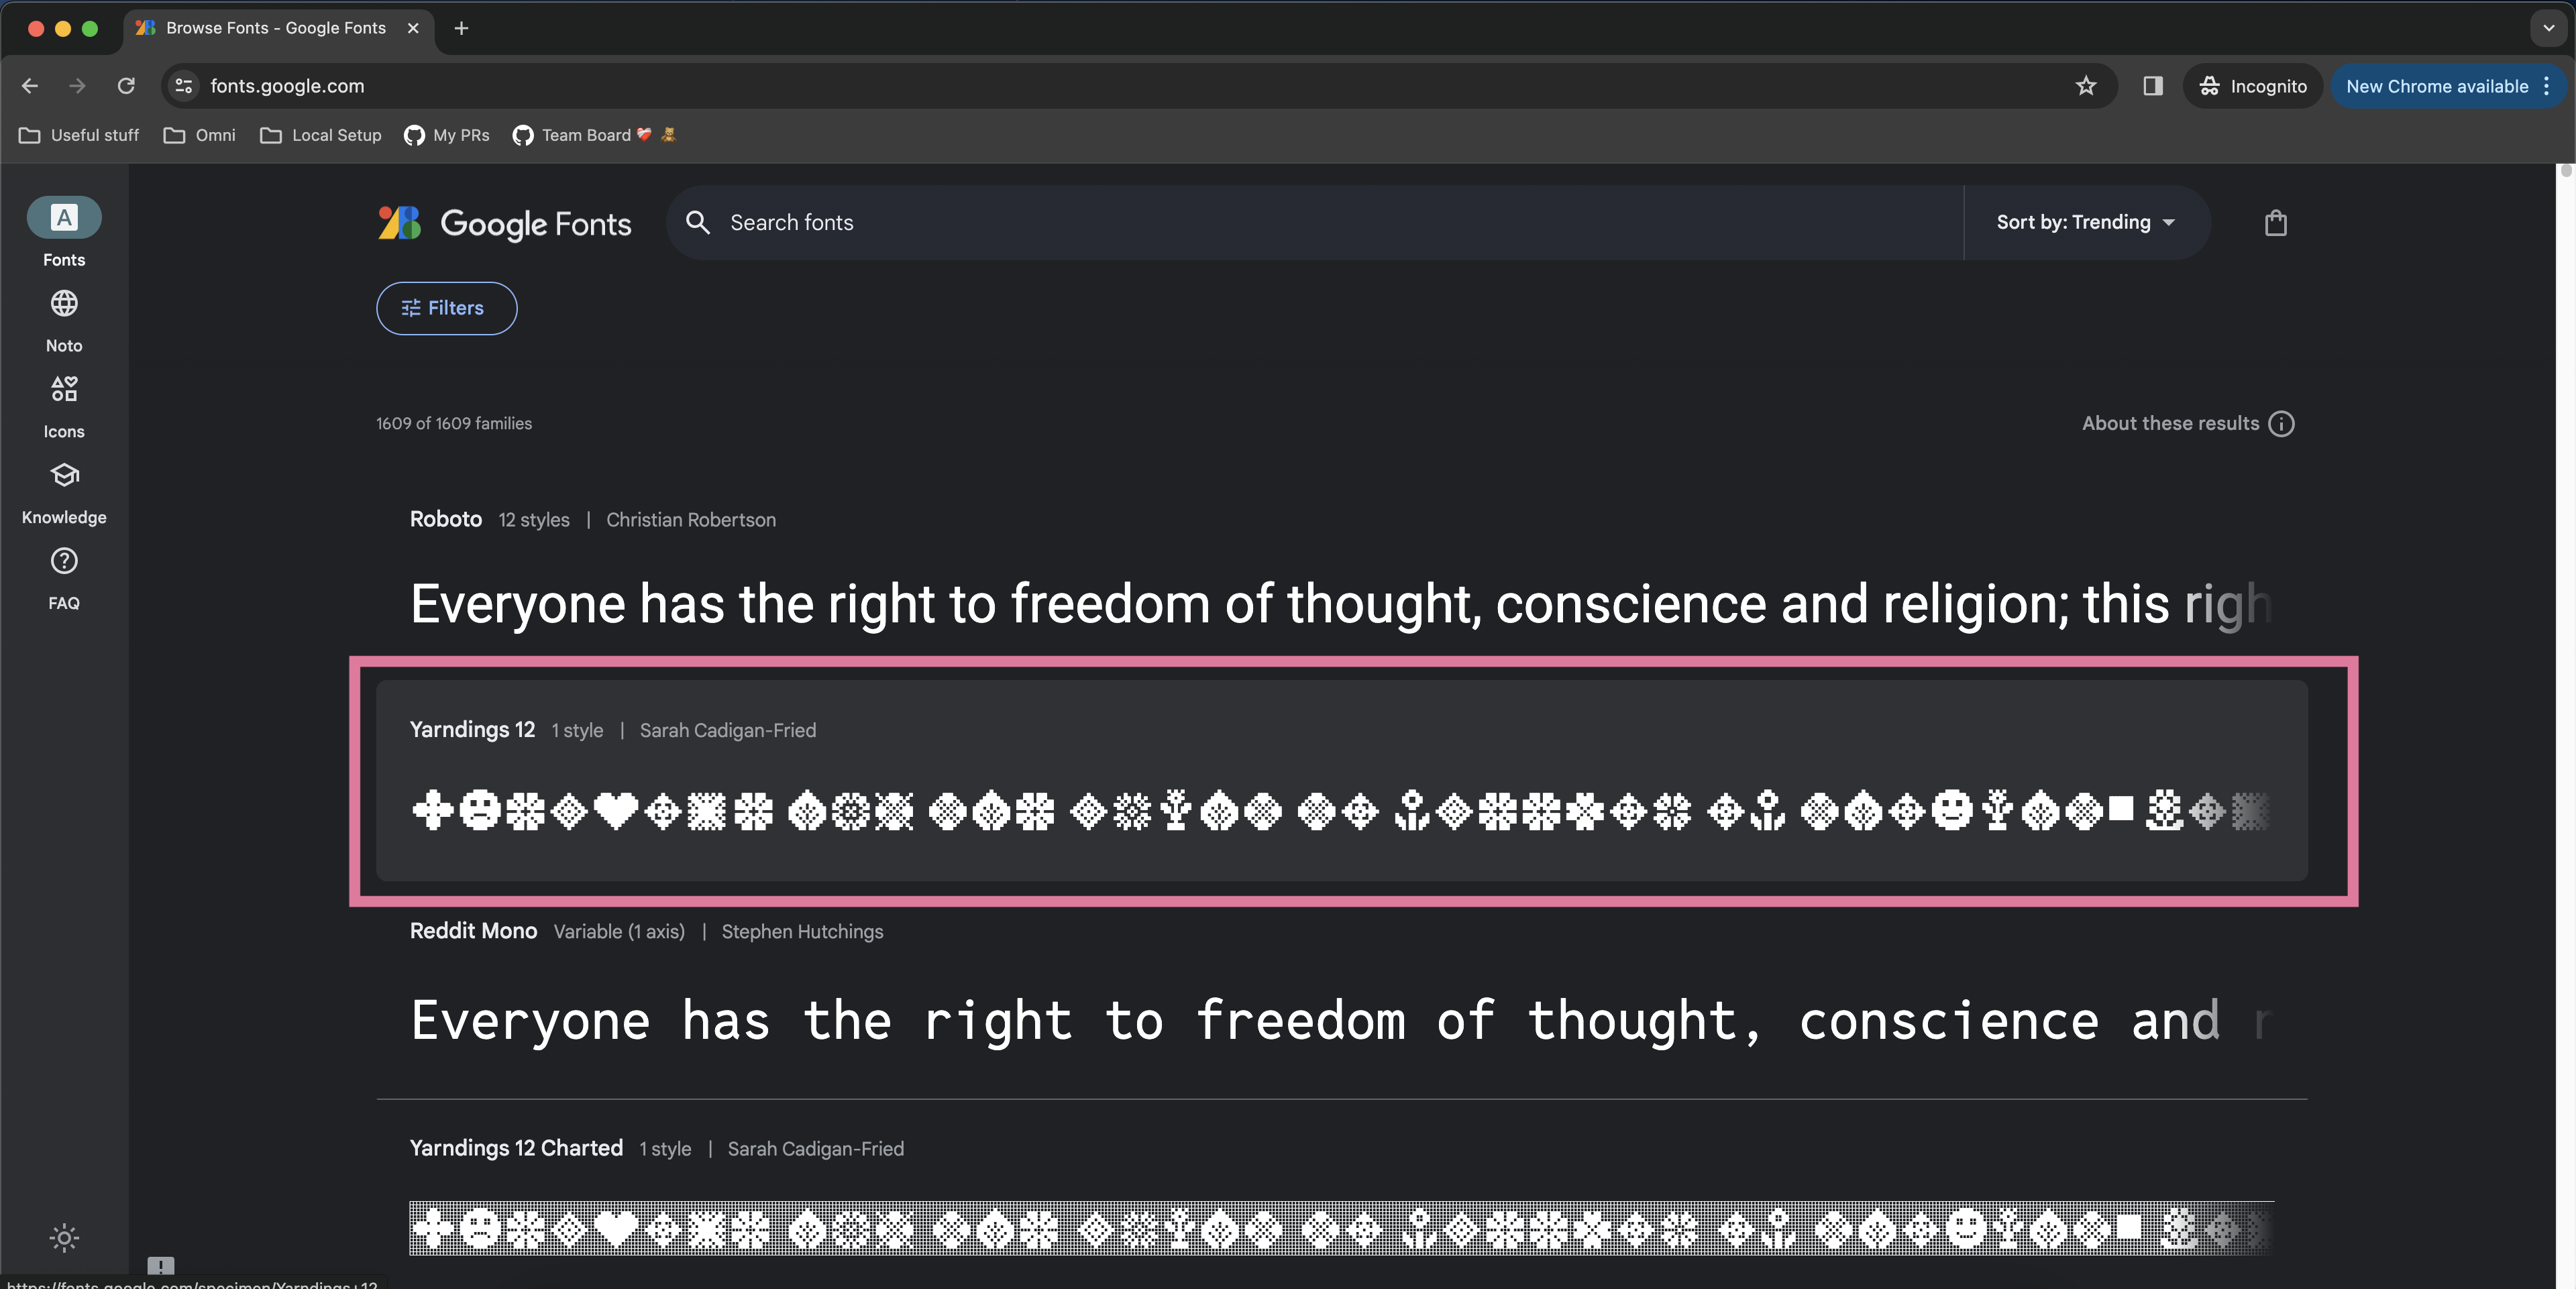
- Go to fonts.google.com and click on your font of choice. For this example, we’ll be using the “Yarndings 12” font.
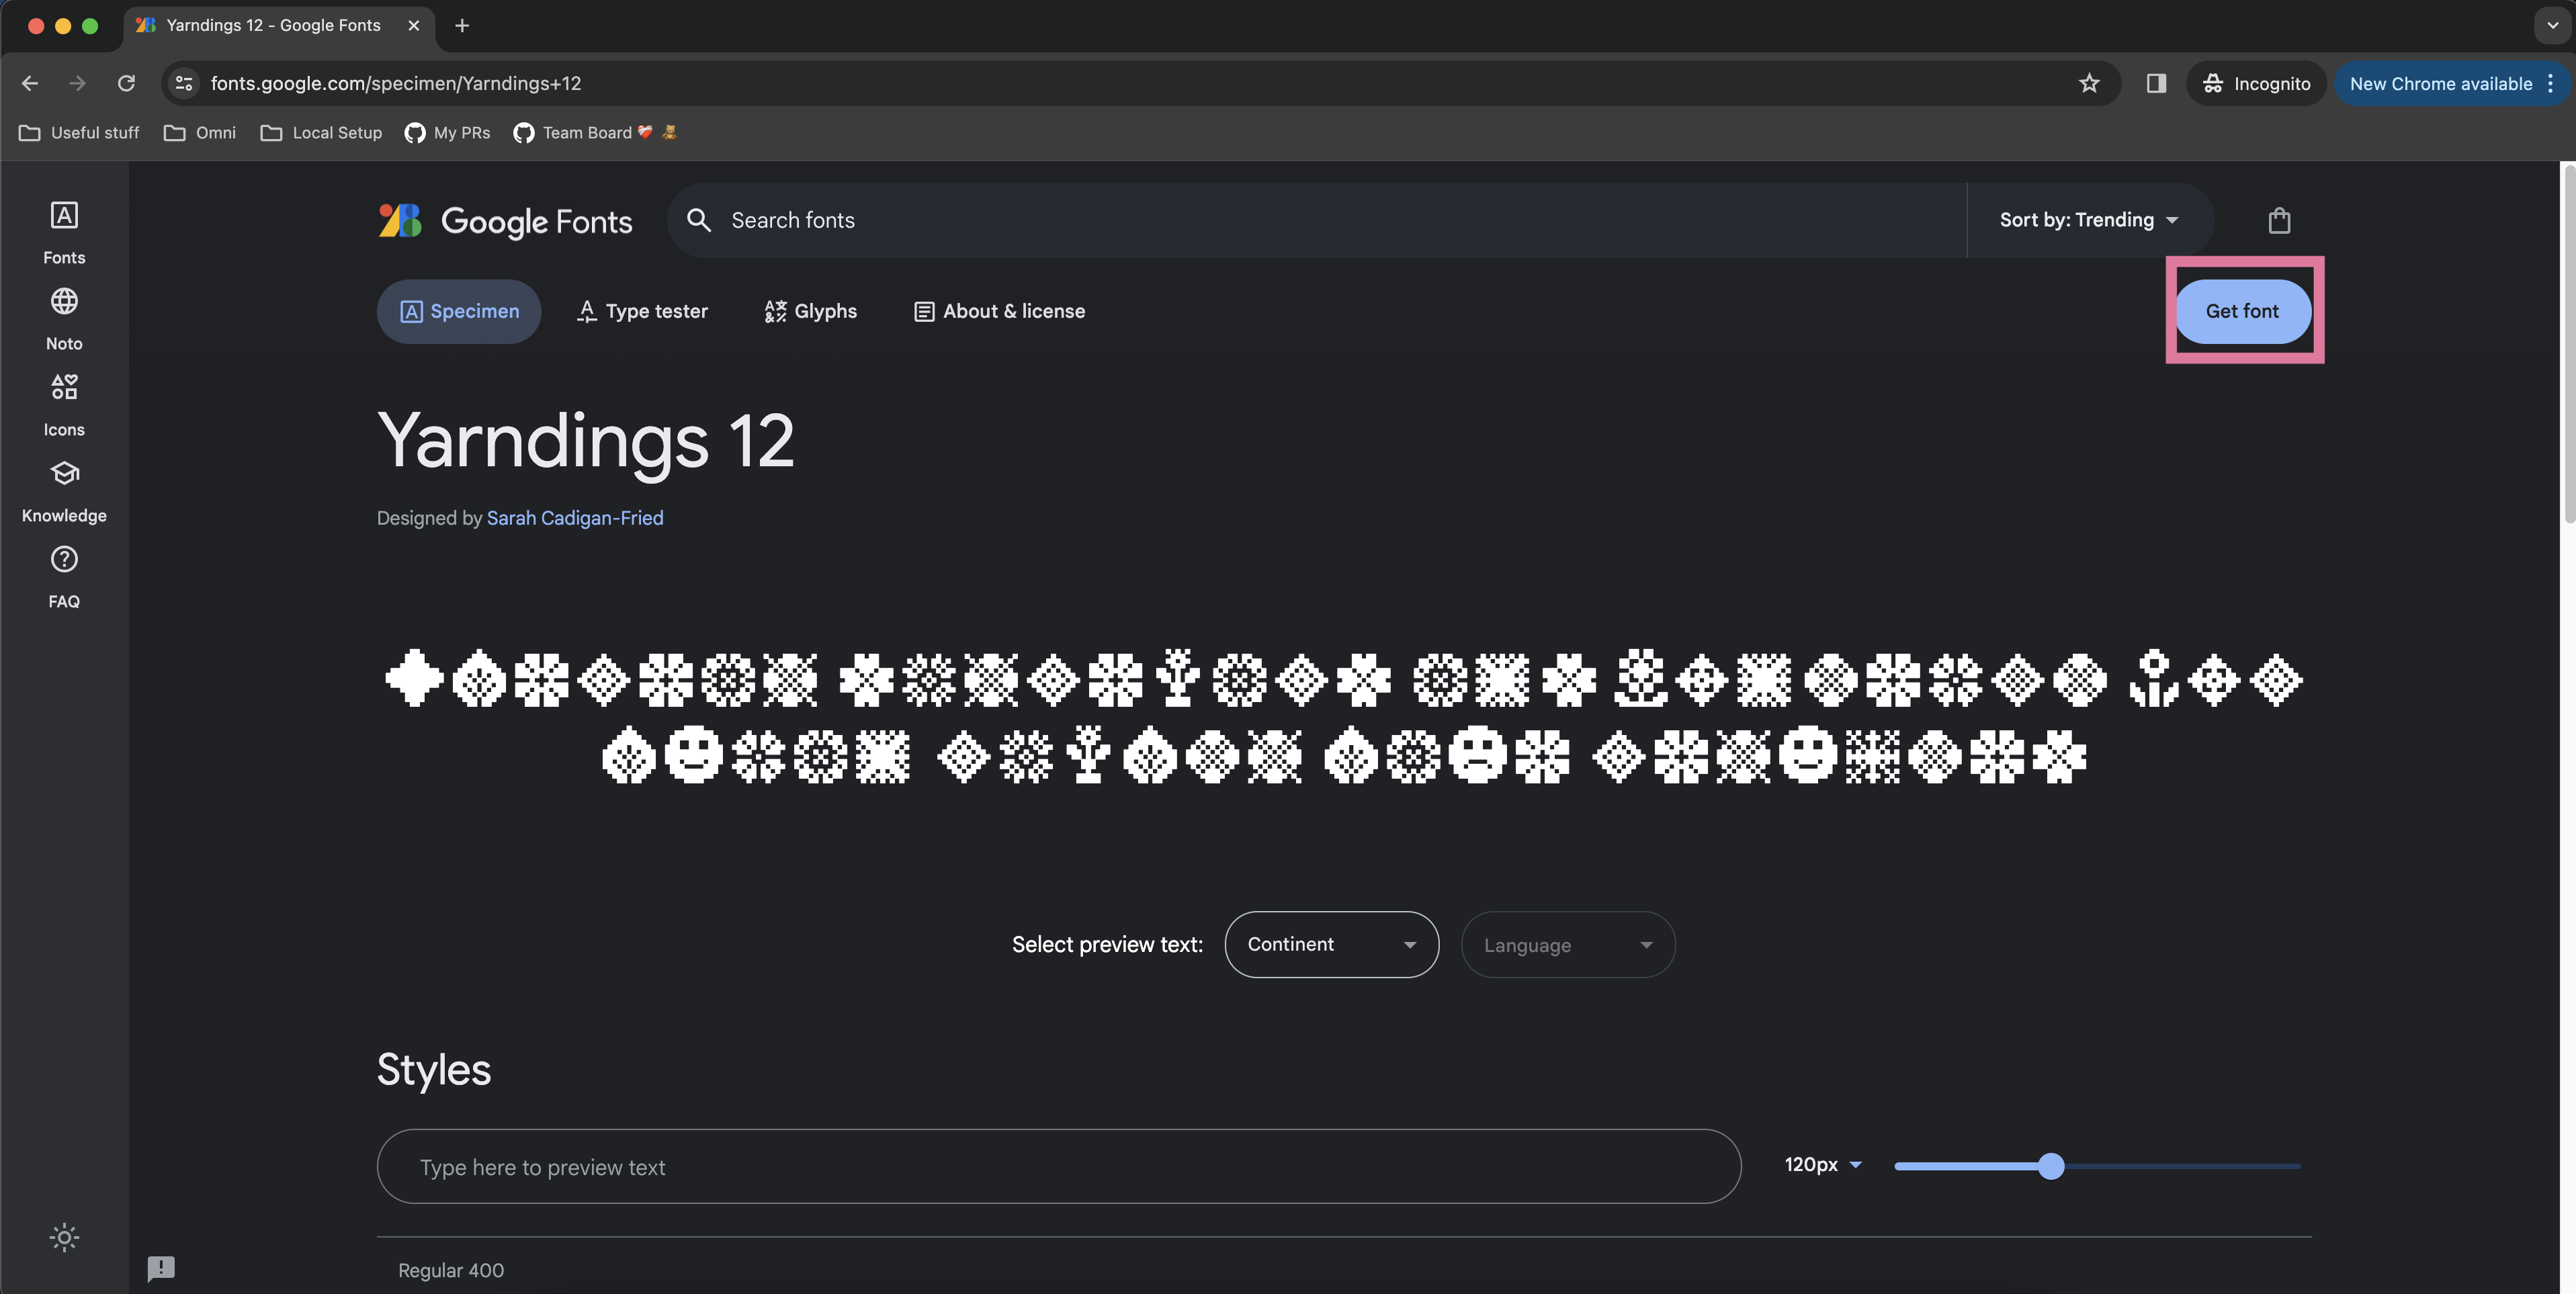
- That click should take you to a font specimen page. On that font specimen page, click the “Get font” button.
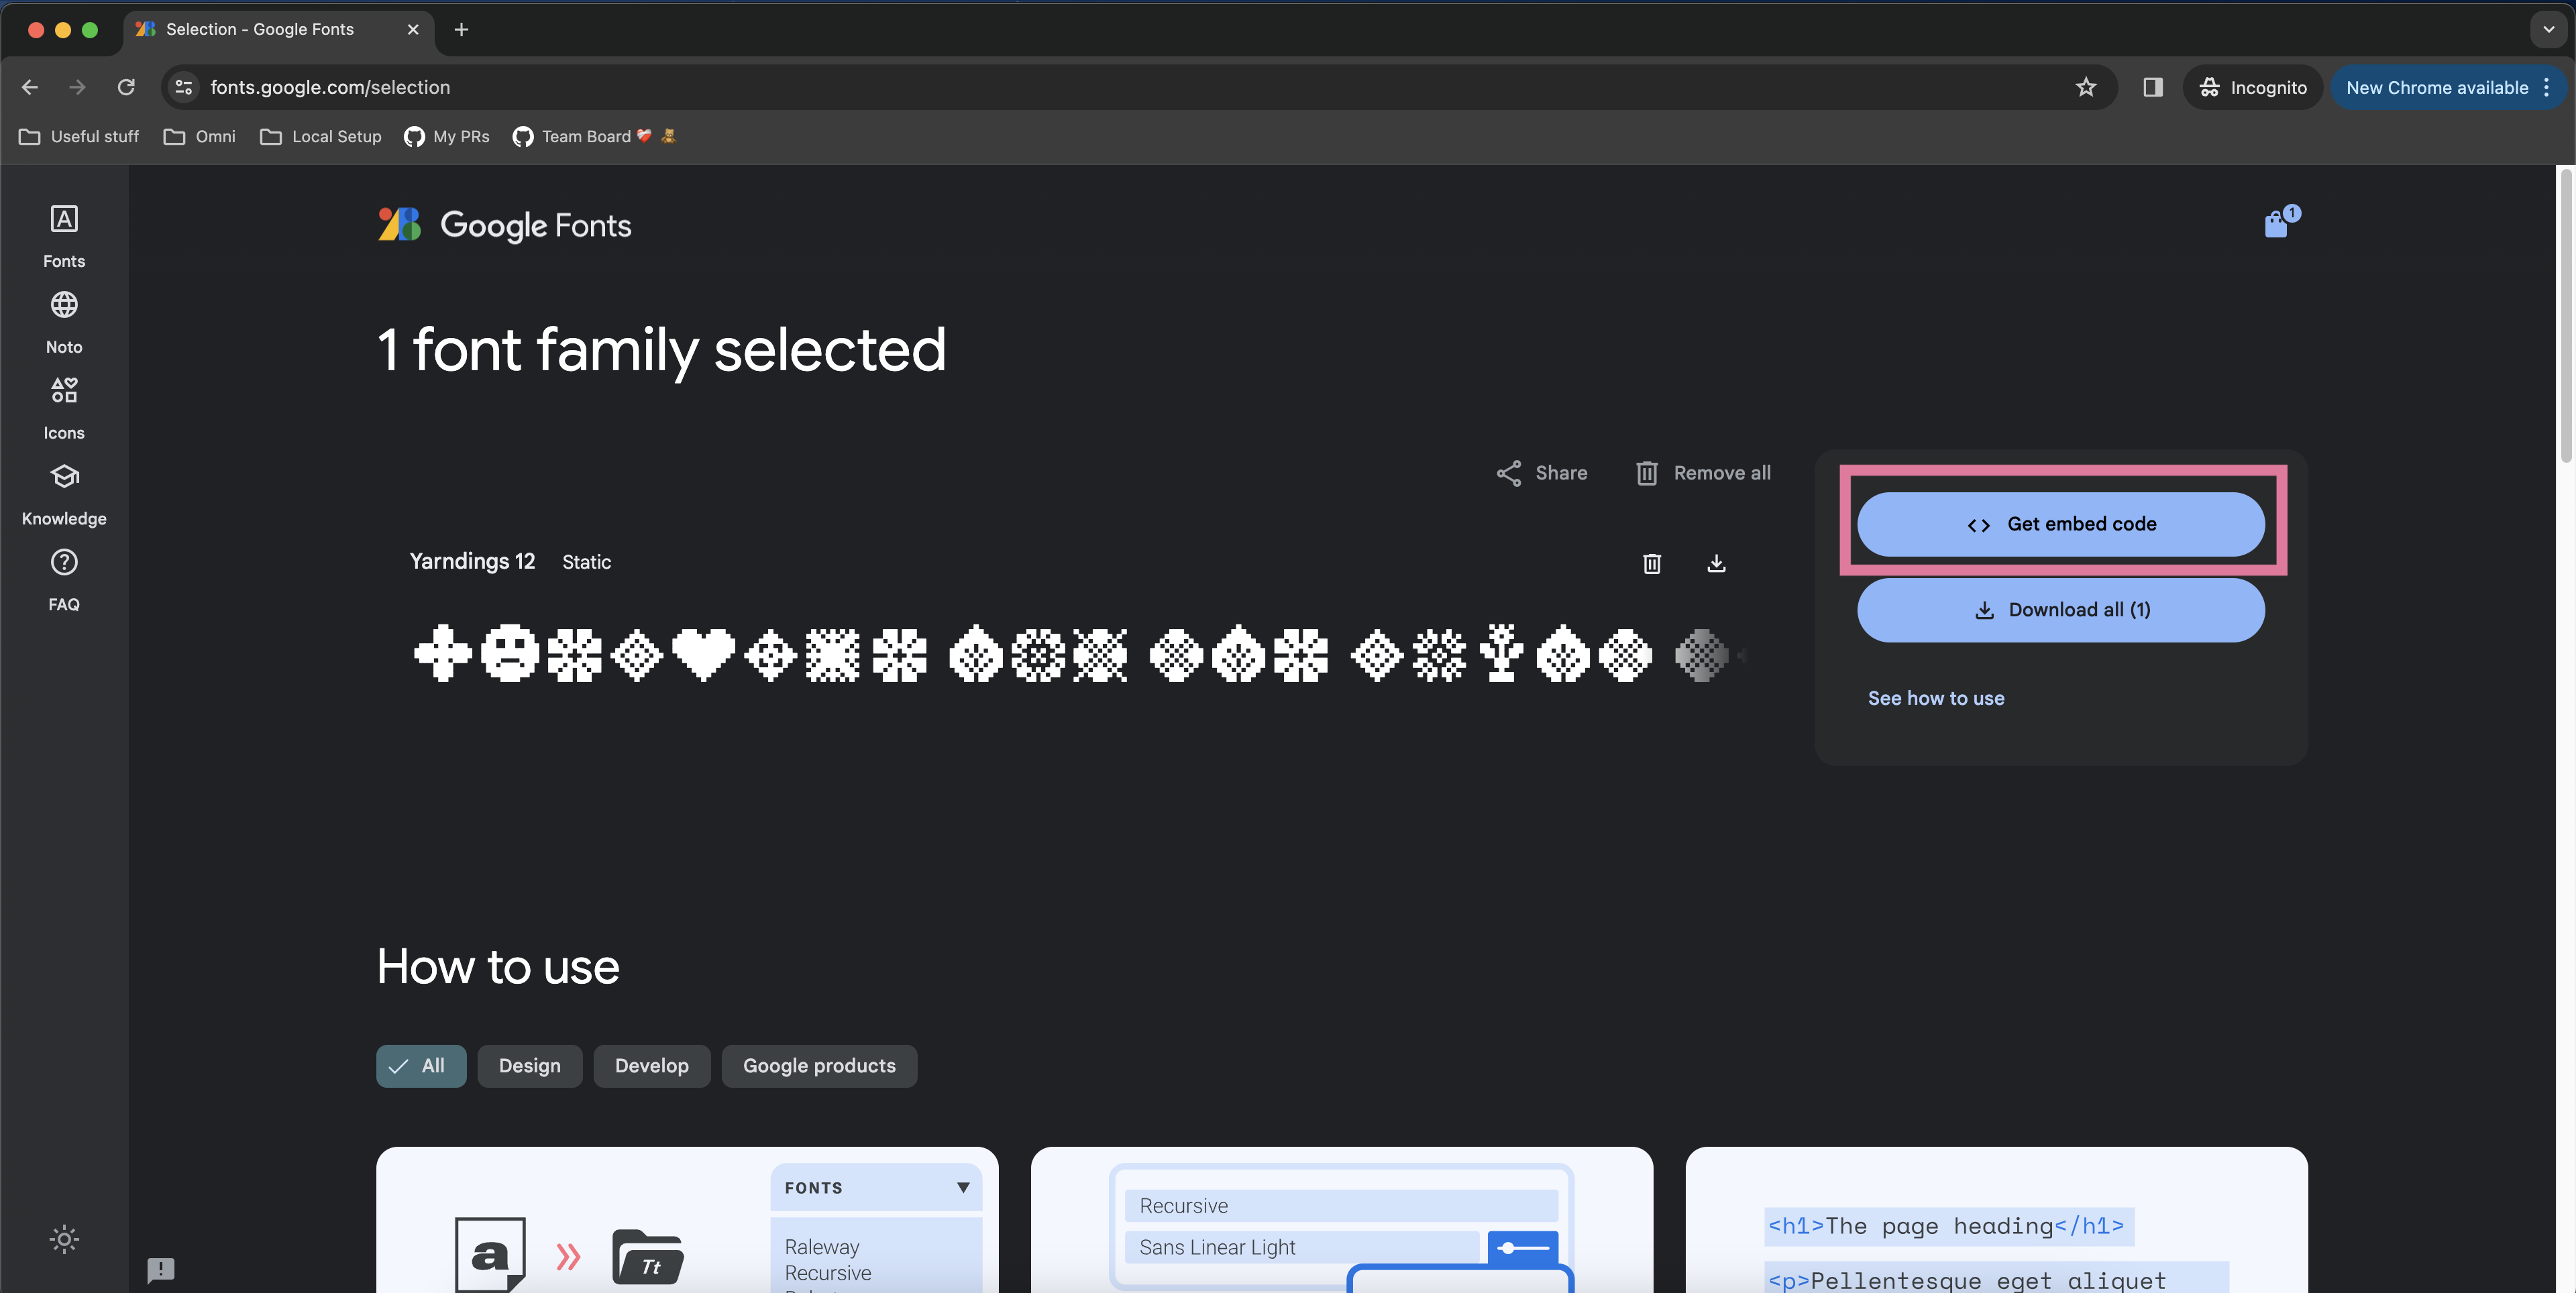
- After pressing “Get font” you’ll be taken to a selection page. On that selection page, click the “Get embed code” button.
- Go to the fonts.googleapis.com link that appears in the third <link> element of the example embed code. Note that some Google Fonts allow you to customize font weight and font style in the left panel so feel free to filter down to the exact font styling you’d like.
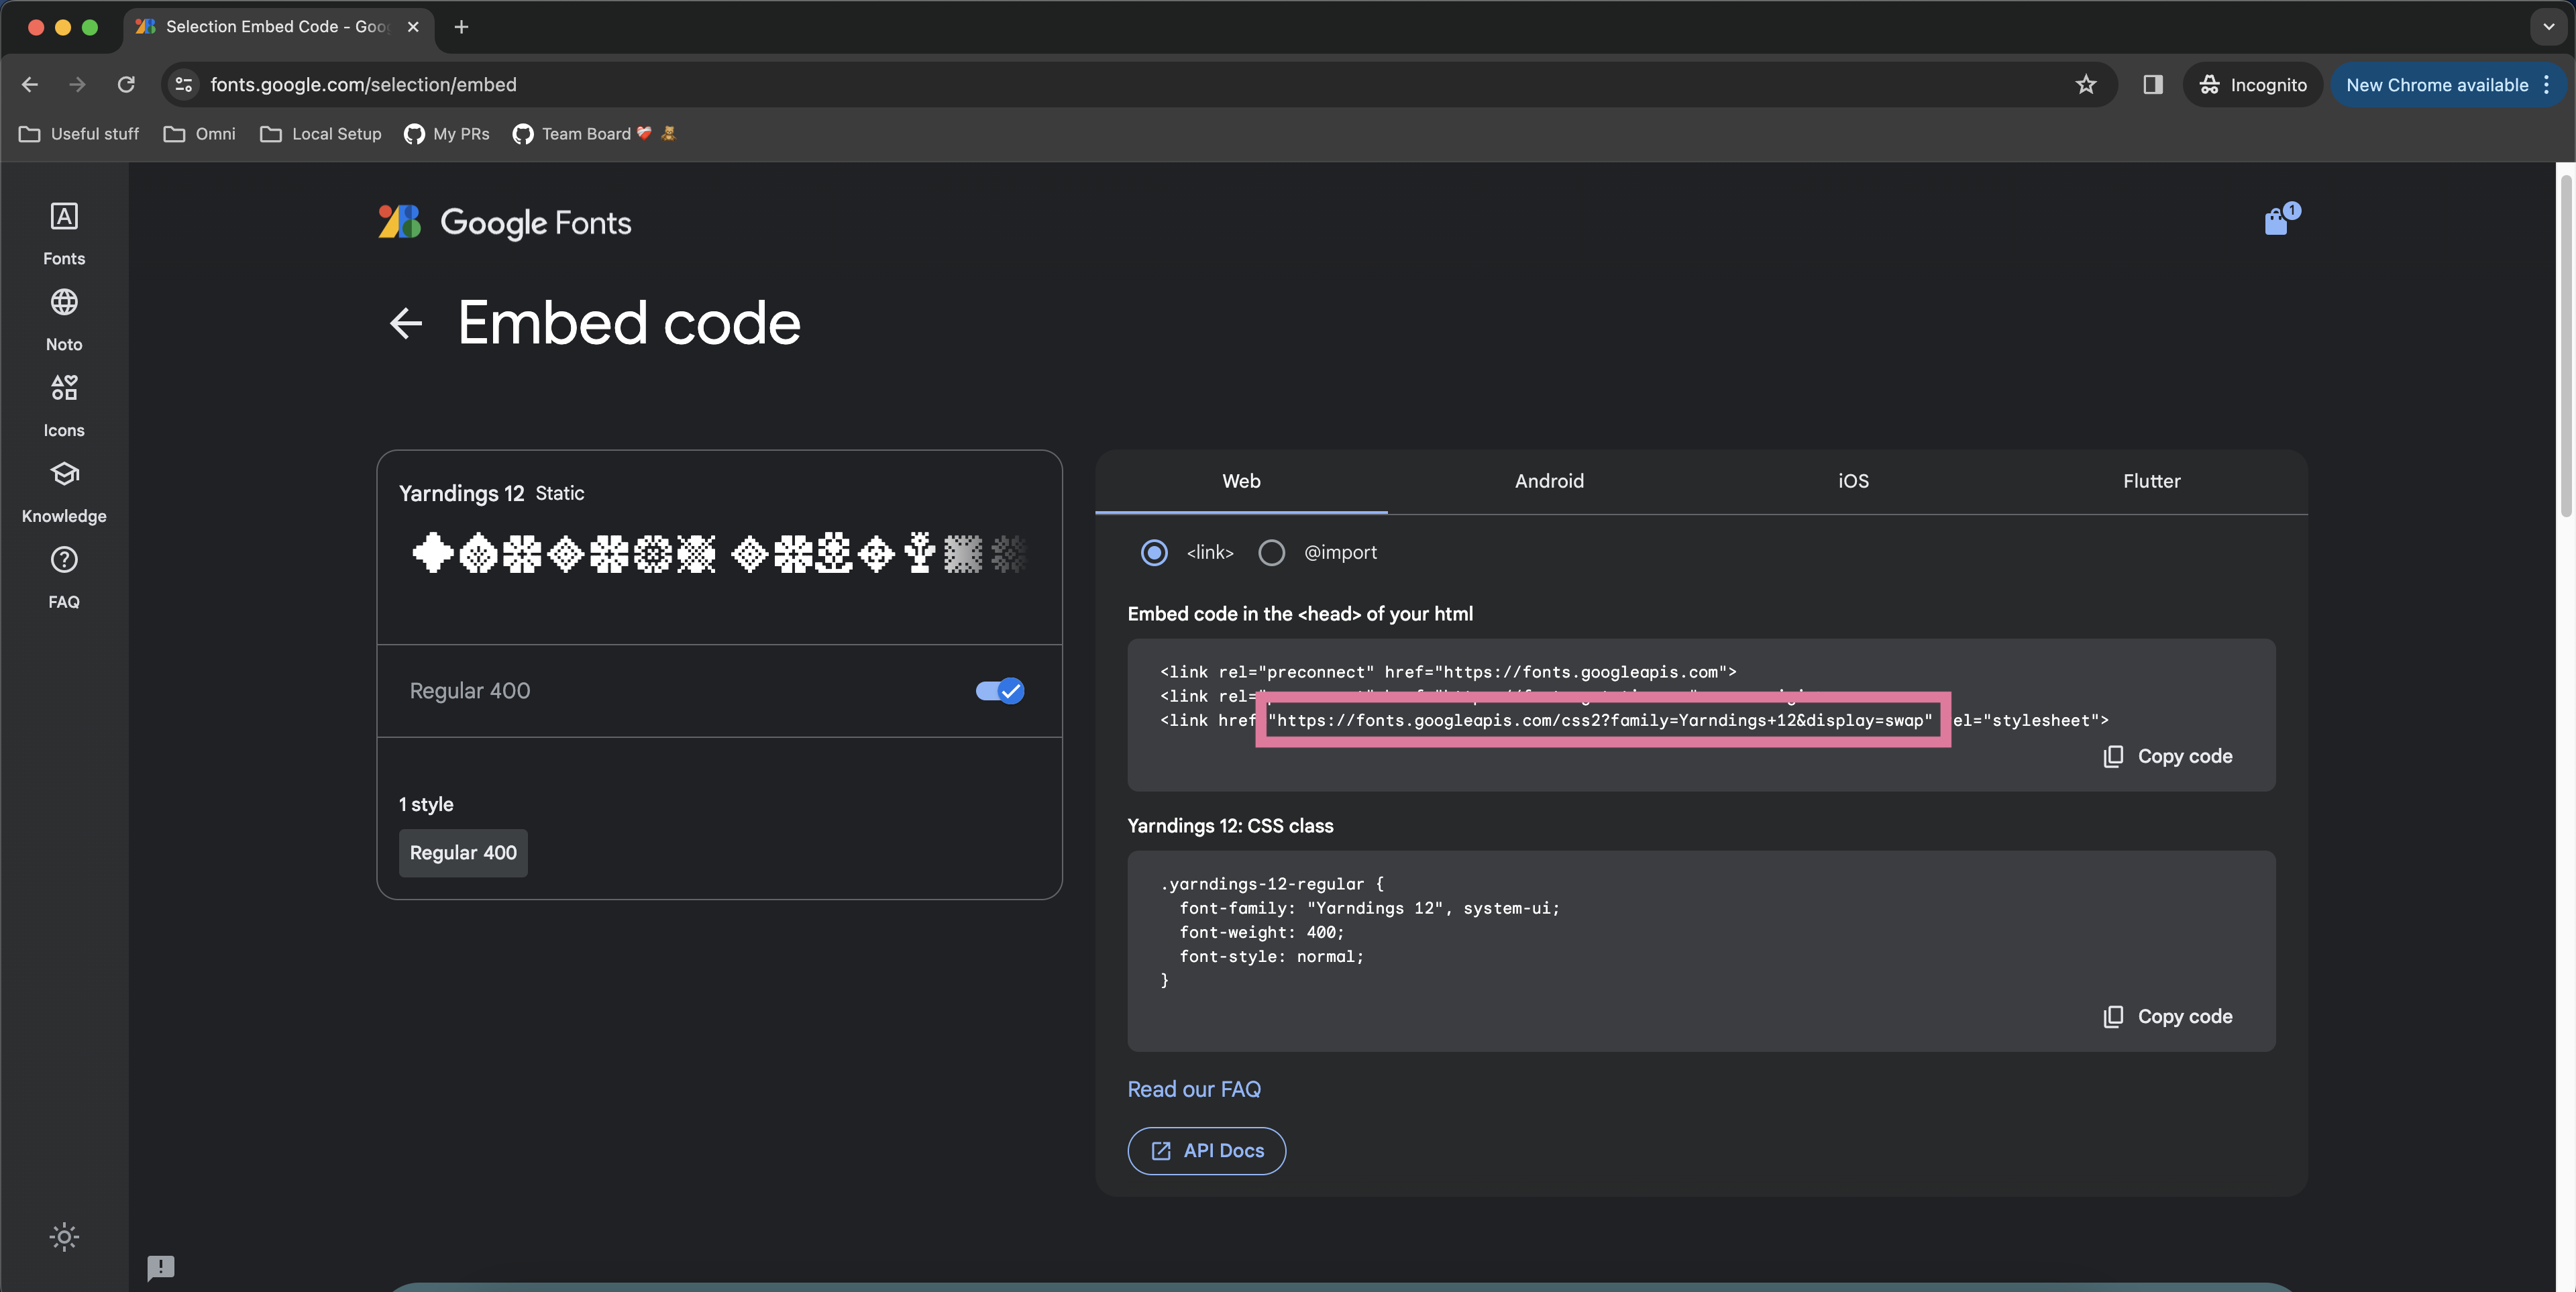
- Find the @font-face at-rule under labeled “latin” and copy the src property url(...).
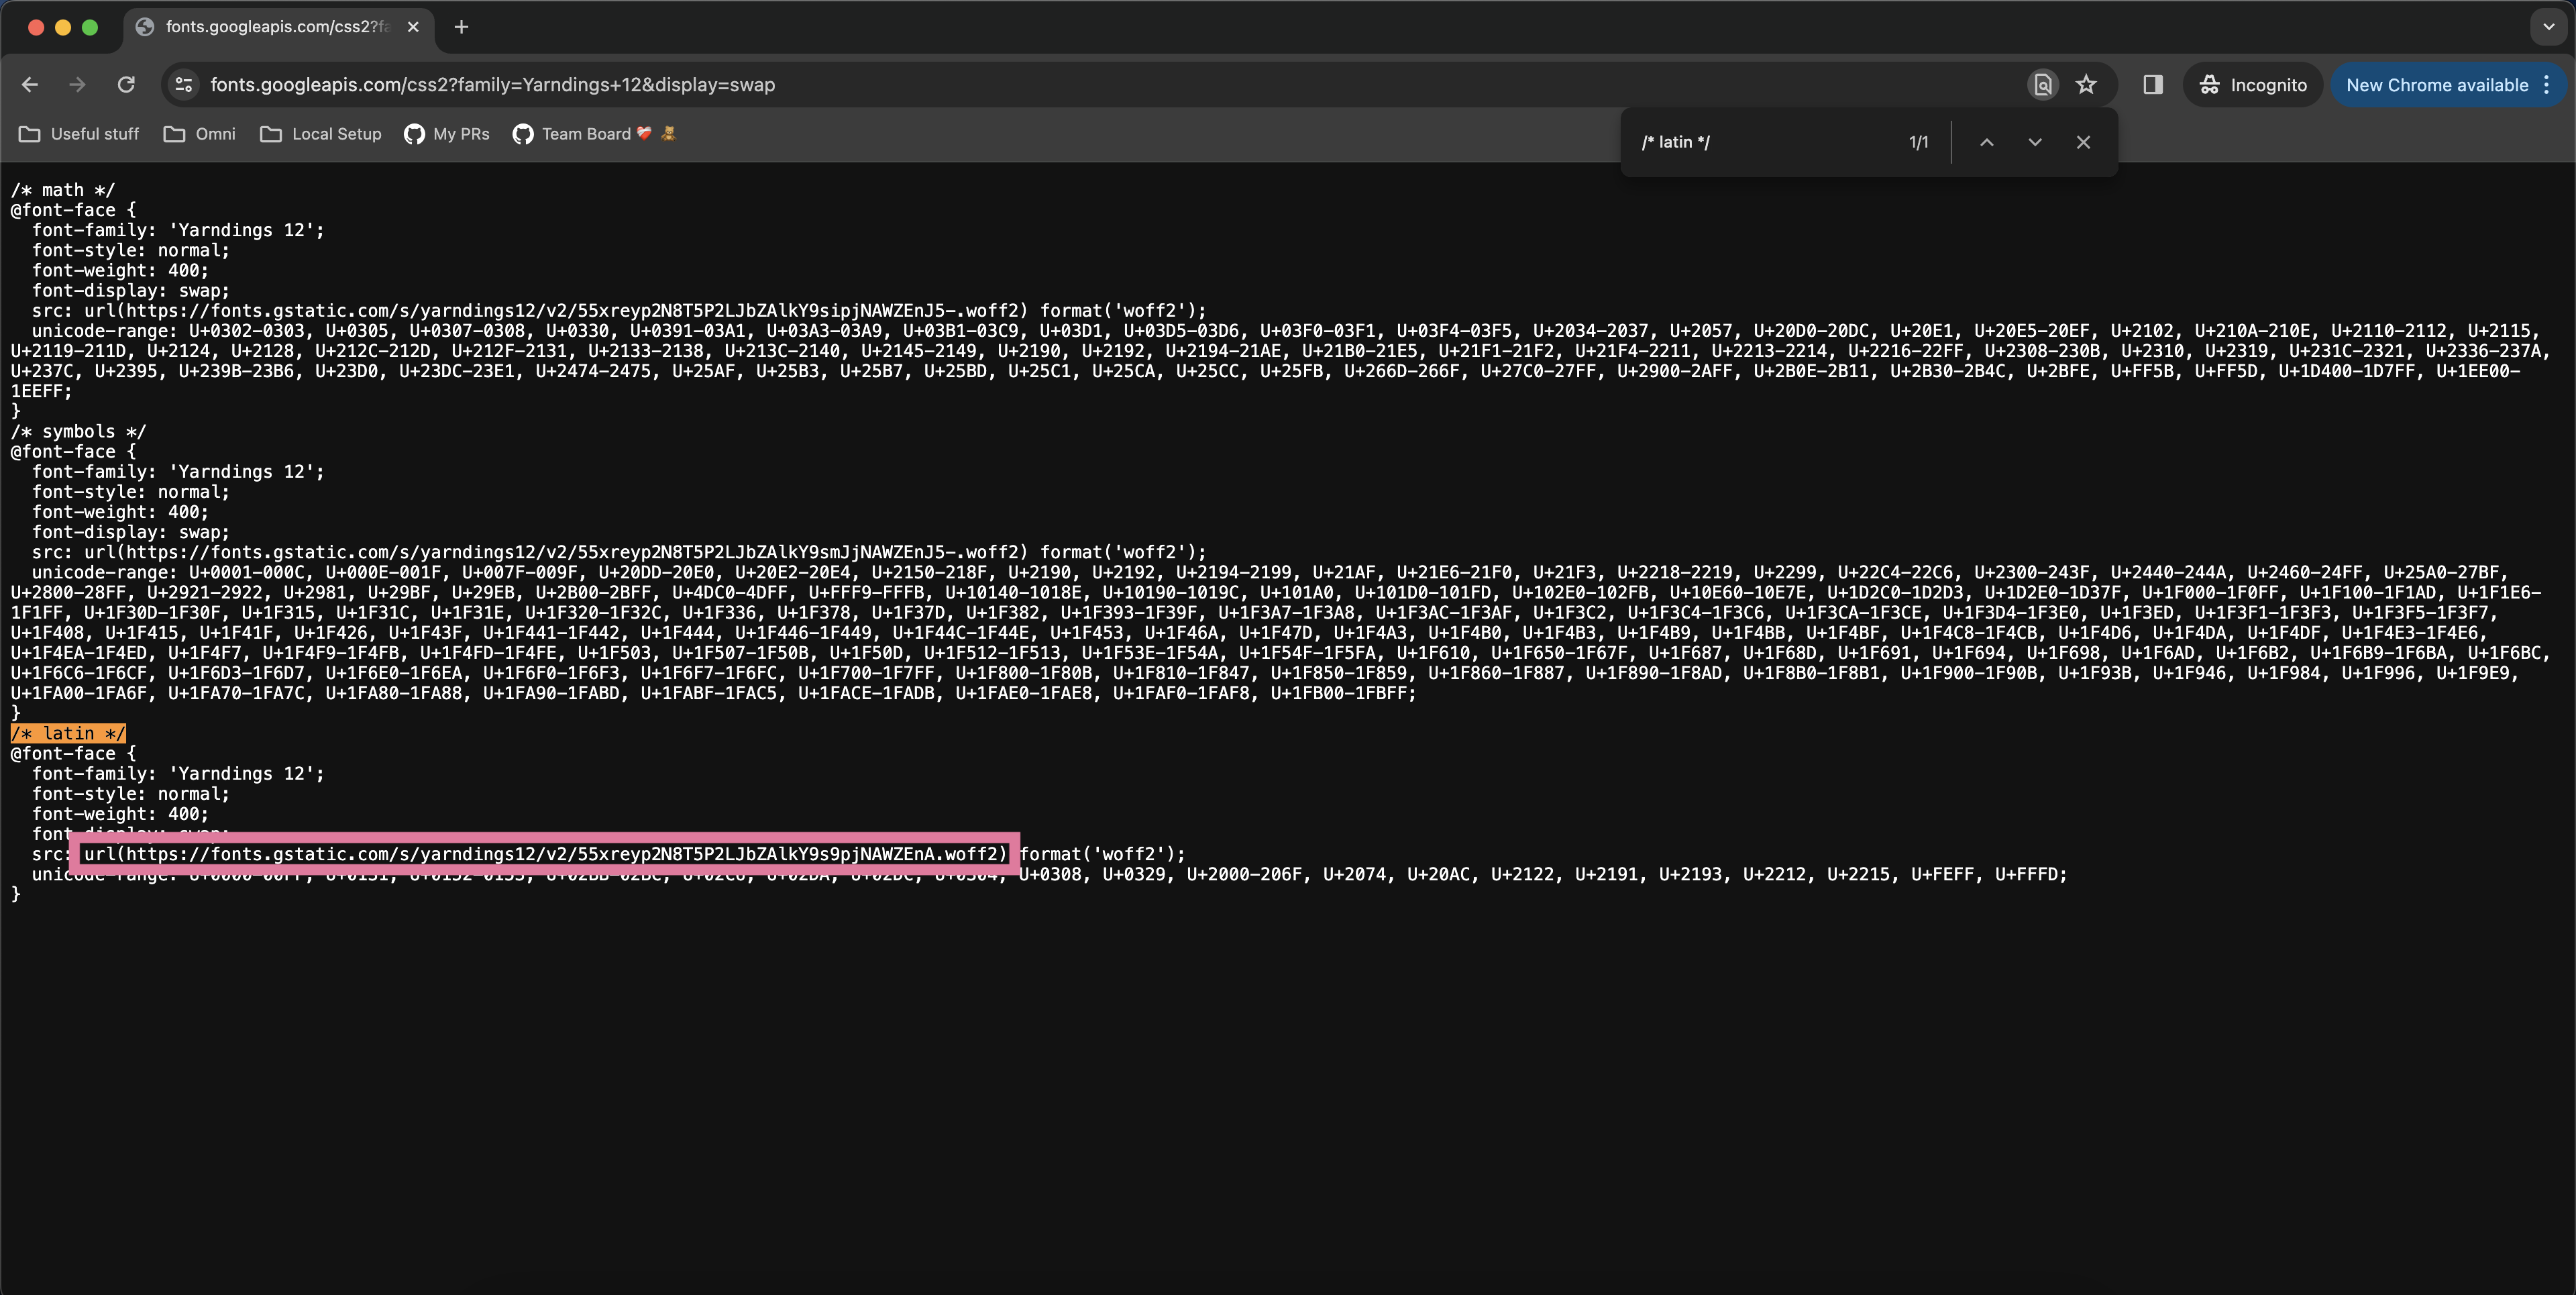
- Pass that url(...) value into the appropriate customTheme property when generating your Omni SSO embed link.
  {
    "dashboard-tile-title-font-family": "url(https://fonts.gstatic.com/s/yarndings12/v2/55xreyp2N8T5P2LJbZAlkY9s9pjNAWZEnA.woff2)",
  }
- And voilà!
Manually Generate a Signature and URL (Hard Mode)
The following pieces of data are used to generate a signature:
| Property | Description | Required |
|---|---|---|
| URL | The URL to your Omni instances embed login route. | yes |
| Content path | The path to the content you wish to embed. | yes |
| External id | An external id to reference the external user. This should be unique for your external definition of user. | yes |
| Name | Human readable name for the user | yes |
| Nonce | 32 character (byte) unique string | yes |
| Entity | An id to reference the entity the user belongs to. Commonly is the customer name or other identifying organization for this user | no |
| Filter Search Param | Encoded string representing dashboard filter values. This can be derived by copying the substring after the "?" from a dashboard URL with non-empty filter values. | no |
| Link Access | A string that allows you to customize which other Omni dashboards can be linked to from the embedded dashboard. If set to "__omni_link_access_open", all links on the embedded dashboard are permissed and shown. Alternatively, a comma-separated list of dashboard IDs can be passed (i.e. "abcd1234,efgh5678,ijkl9999") to only permiss to specific dashboard IDs. Finally, if the parameter is undefined, all links to other Omni dashboards are restricted. Note that link URLs to anything other than an Omni Dashboard will be shown and permissed regardless of the linkAccess parameter. | no |
| Prefers Dark | Dark mode setting. Can be "true", "false" or "system" | no |
| Theme | Visual theming options. One of "dawn", "vibes", "breeze" or "blank". | no |
| User attributes | JSON serialized, key value pairs matching defined user attributes in your system. | no |
To generate the signature, the follow steps must be followed exactly:
- Concatenate the properties, delimited by a newline character in the exact order enumerated below. Note they are in alphabetical order, with the exception of the leading login URL:
- login URL
- content path
- external id
- name
- nonce
Next, concatenate the optional properties, again in alphabetical order. Any undefined optional properties must be omitted (no space, no extra newline, etc):
- entity
- filter search param
- Must be manually URI encoded unless pulled from Omni dashboard URL (in which case the string is already URI encoded).
- link access
- prefers dark
- theme
- user attributes
- Must be JSON stringified
There must be no leading or trailing spaces, and only a single newline between each part of the signature. Example:
https://example.embed-omniapp.co/embed/login
/embed/dashboards/123abc
luke@example.com
Luke Skywalker
hN38NgtnV2B3PMILhKQOpwLyJRP4qVv4
Acme Corp
f--users.country=%7B"kind"%3A"EQUALS"%2C"type"%3A"string"%2C"values"%3A%5B"USA"%5D%2C"is_negative"%3Afalse%7D&f--users.state=%7B"kind"%3A"EQUALS"%2C"type"%3A"string"%2C"values"%3A%5B%5D%2C"is_negative"%3Afalse%7D&f--inventory_items.cost=%7B"kind"%3A"GREATER_THAN"%2C"type"%3A"number"%2C"values"%3A%5B"20"%5D%2C"is_negative"%3Afalse%2C"is_inclusive"%3Afalse%7D
true
__omni_link_access_open
vibes
{"planet": "tatooine"}
- Sign the string using your secret key (available in your admin portal) with an HMAC sha256 digest algorithm, encoded as a base64url string. See https://datatracker.ietf.org/doc/html/rfc4648#page-7 for more information about base64url. Node.js example:
const hmac = crypto.createHmac("sha256", secret);
hmac.update(data);
return hmac.digest("base64url");
Crafting the URL
To generate the signed url, take the parts from above, URL encode them as part of a URL query string and attach the generated signature.
The URL form usually:
https://<your org name>.embed-omniapp.co/embed/login
Search params are then url encoded and appended. Order of params is irrelevant when generating the login url.
?contentPath=%2Fembed%2Fdashboards%2F123abc
&externalId=luke%40example.com
&name=Luke%20Skywalker
&nonce=hN38NgtnV2B3PMILhKQOpwLyJRP4qVv4
&entity=Acme+Corp
&theme=vibes
&userAttributes=%7B%22planet%22%3A%22tatooine%22%7D
&filterSearchParam=f--order_items.status%3D%257B%22kind%22%253A%22EQUALS%22%252C%22type%22%253A%22string%22%252C%22topic%22%253A%22order_items%22%252C%22values%22%253A%255B%22Returned%22%255D%252C%22base_view%22%253A%22order_items%22%252C%22is_negative%22%253Afalse%257D
&linkAccess=__omni_link_access_open
&prefersDark=true
&signature=rpf-YbMMTd2XzO_HRyP1E_RiYpQYqBkU-X9iUMplEz4
Note: newlines are not required, they were added to enhance readability.
All together this should look like:
https://example.embed-omniapp.co/embed/login
?contentPath=%2Fembed%2Fdashboards%2F123abc
&externalId=luke%40example.com
&name=Luke%20Skywalker
&nonce=hN38NgtnV2B3PMILhKQOpwLyJRP4qVv4
&entity=Acme+Corp
&theme=vibes
&userAttributes=%7B%22planet%22%3A%22tatooine%22%7D
&filterSearchParam=f--order_items.status%3D%257B%22kind%22%253A%22EQUALS%22%252C%22type%22%253A%22string%22%252C%22topic%22%253A%22order_items%22%252C%22values%22%253A%255B%22Returned%22%255D%252C%22base_view%22%253A%22order_items%22%252C%22is_negative%22%253Afalse%257D
&linkAccess=__omni_link_access_open
&prefersDark=true
&signature=rpf-YbMMTd2XzO_HRyP1E_RiYpQYqBkU-X9iUMplEz4
Note: newlines are not required, they were added to enhance readability.
Map of Property Names to URL names
| Property | URL variant |
|---|---|
| Content Path | contentPath |
| External Id | externalId |
| Name | name |
| Nonce | nonce |
| Prefers Dark | prefersDark |
| Theme | theme |
| Signature | signature |
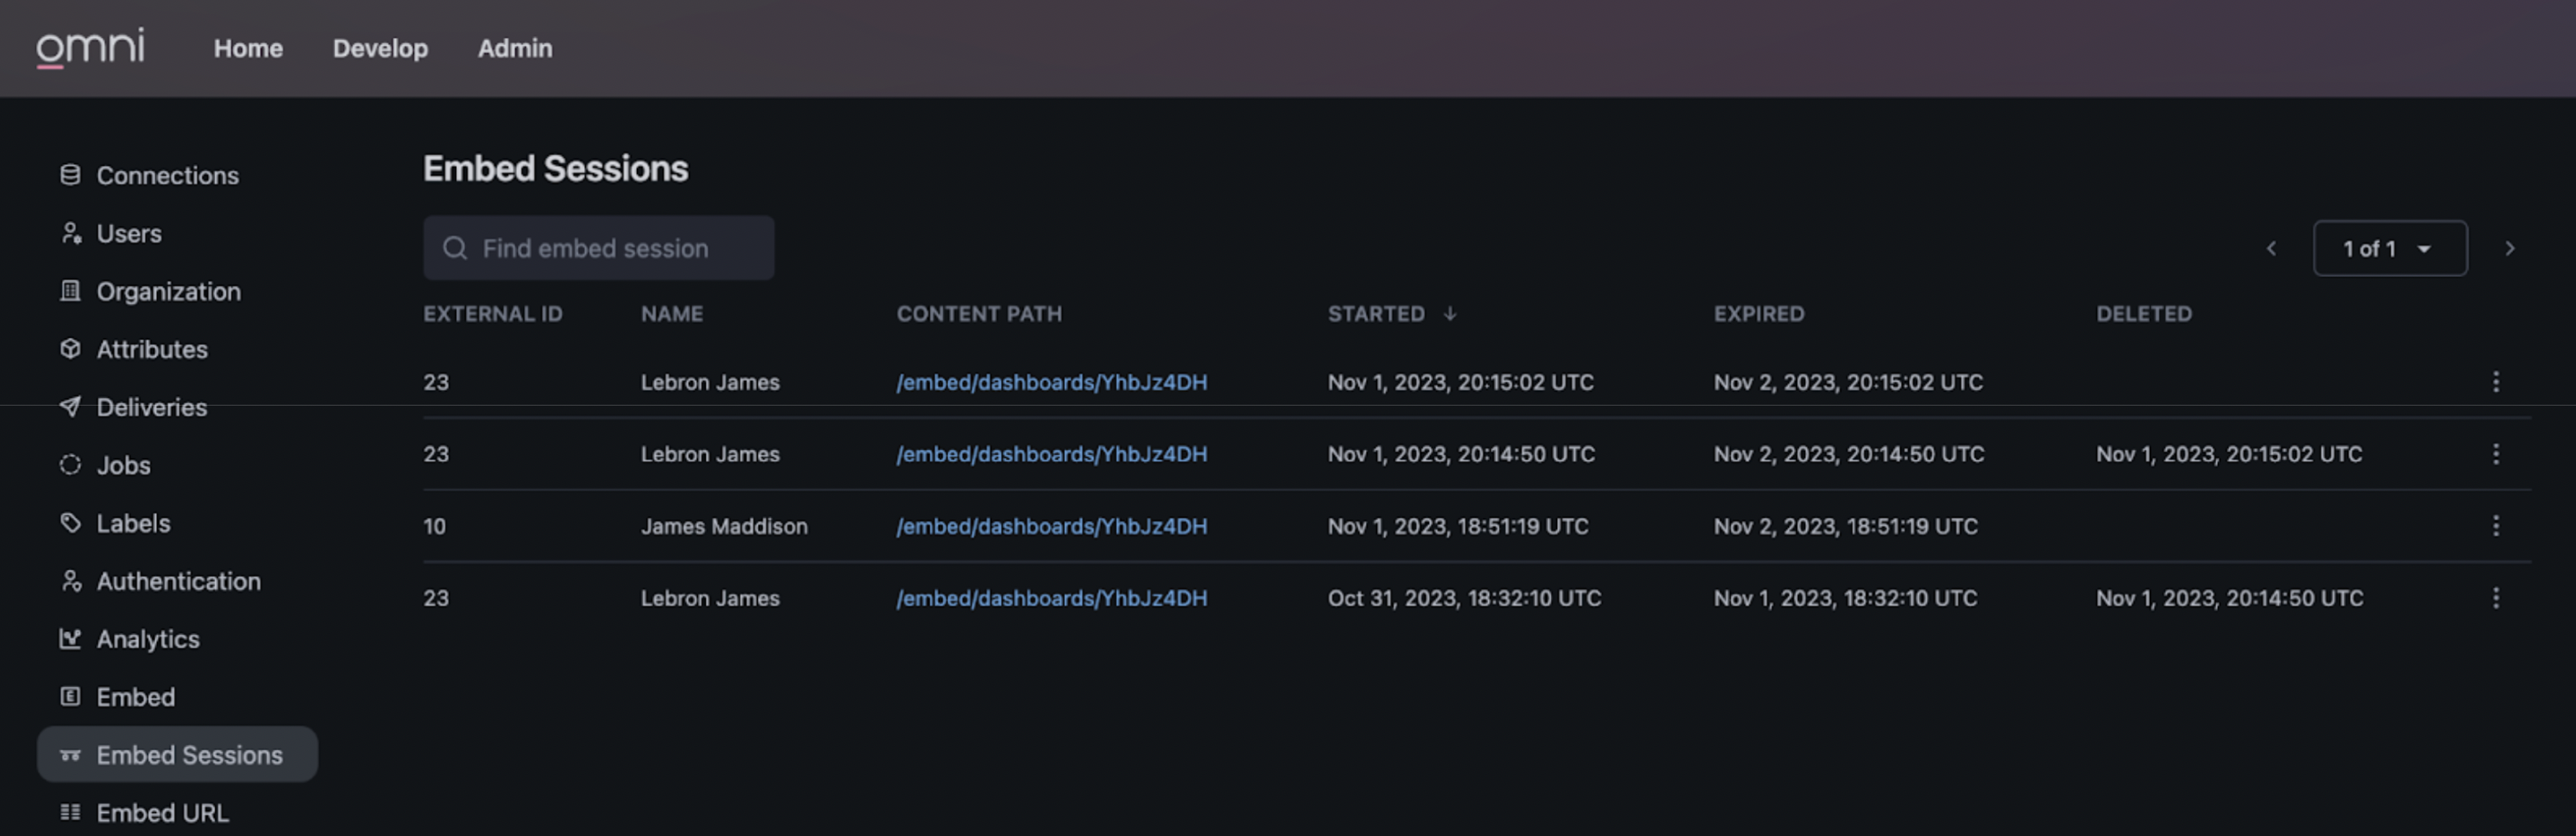
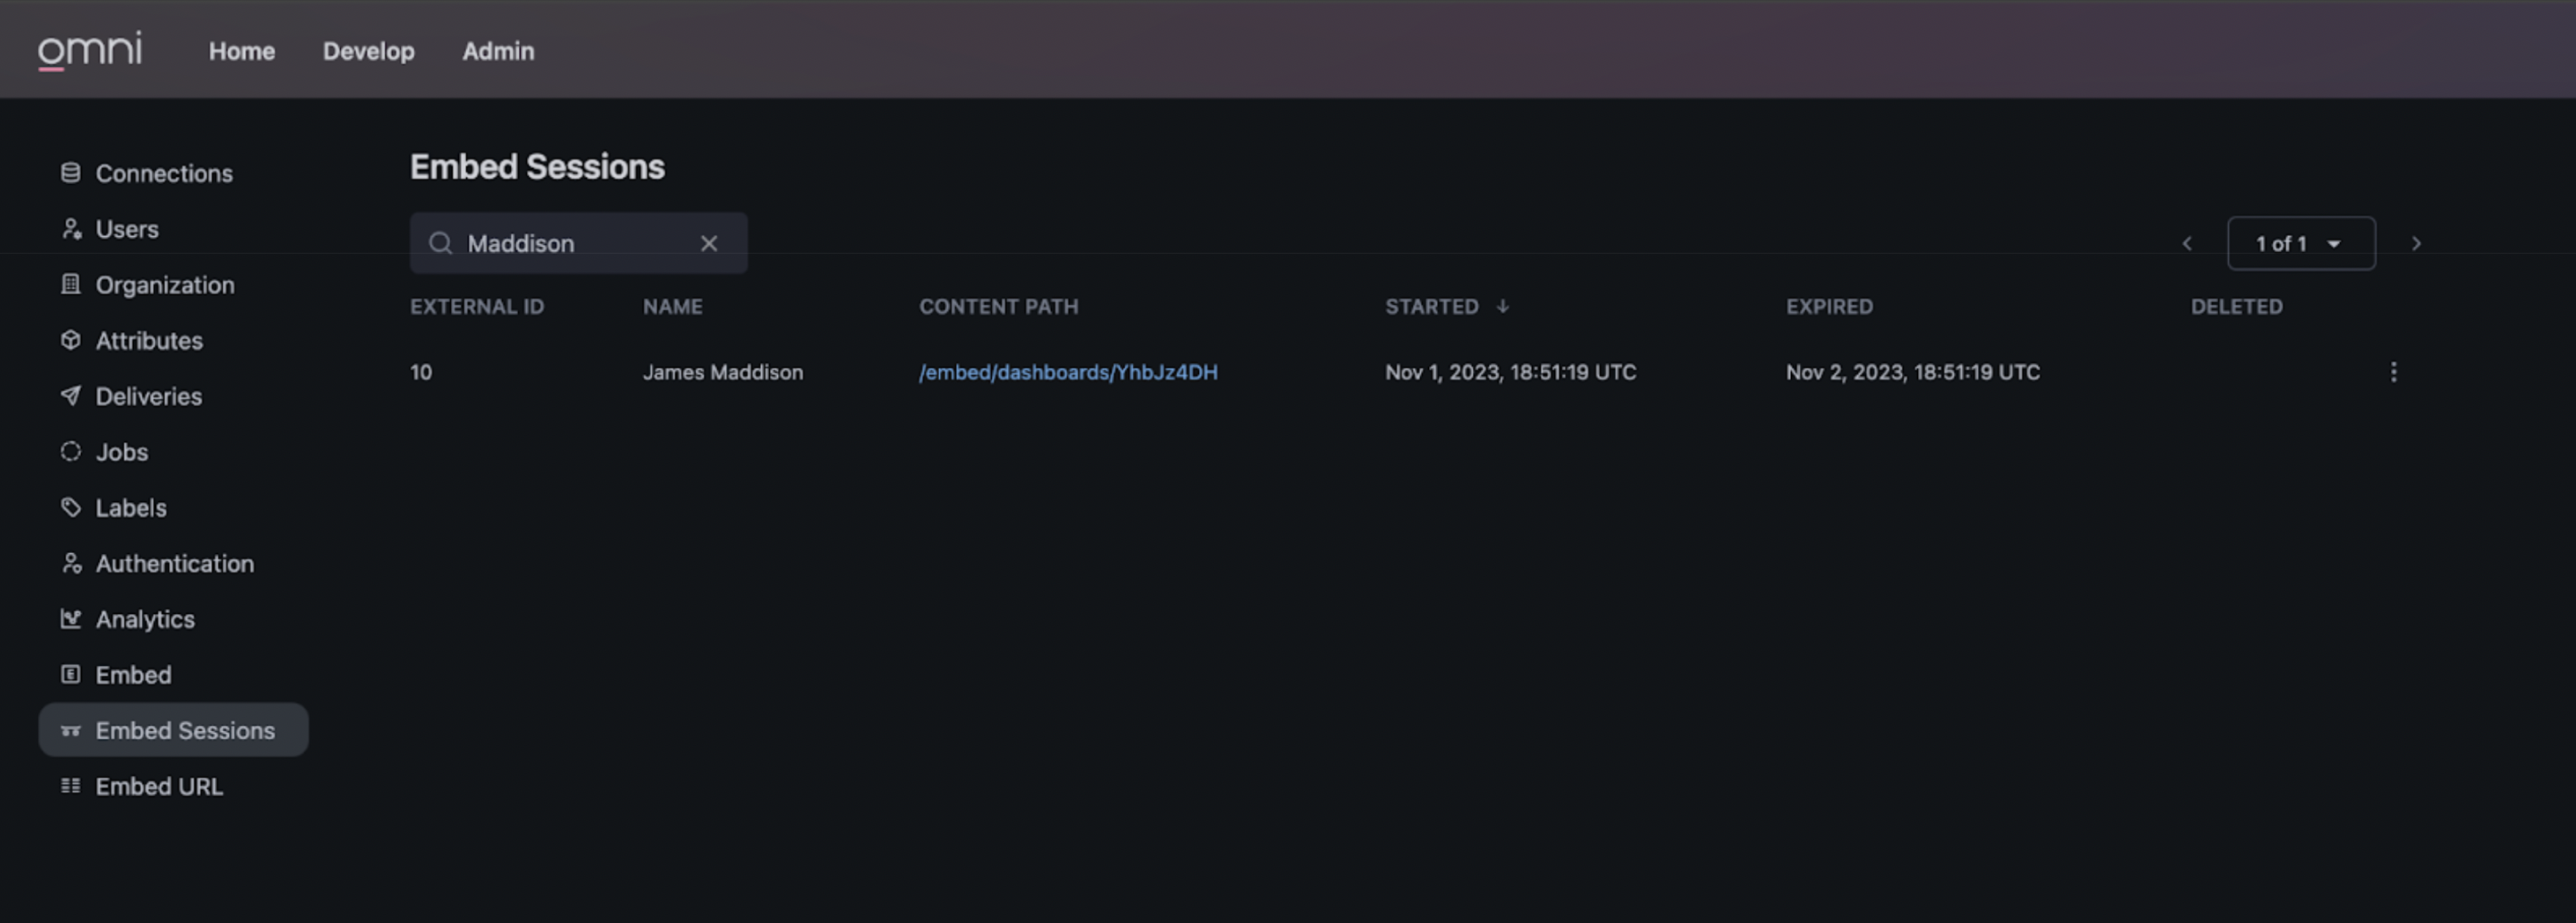
Viewing Embed Sessions
View ongoing and expired embed sessions by going to the Admin > Embed Sessions section of your Omni instance. Note that expired and deleted sessions will mean the embed url used to create the session will render an error and no longer display content.
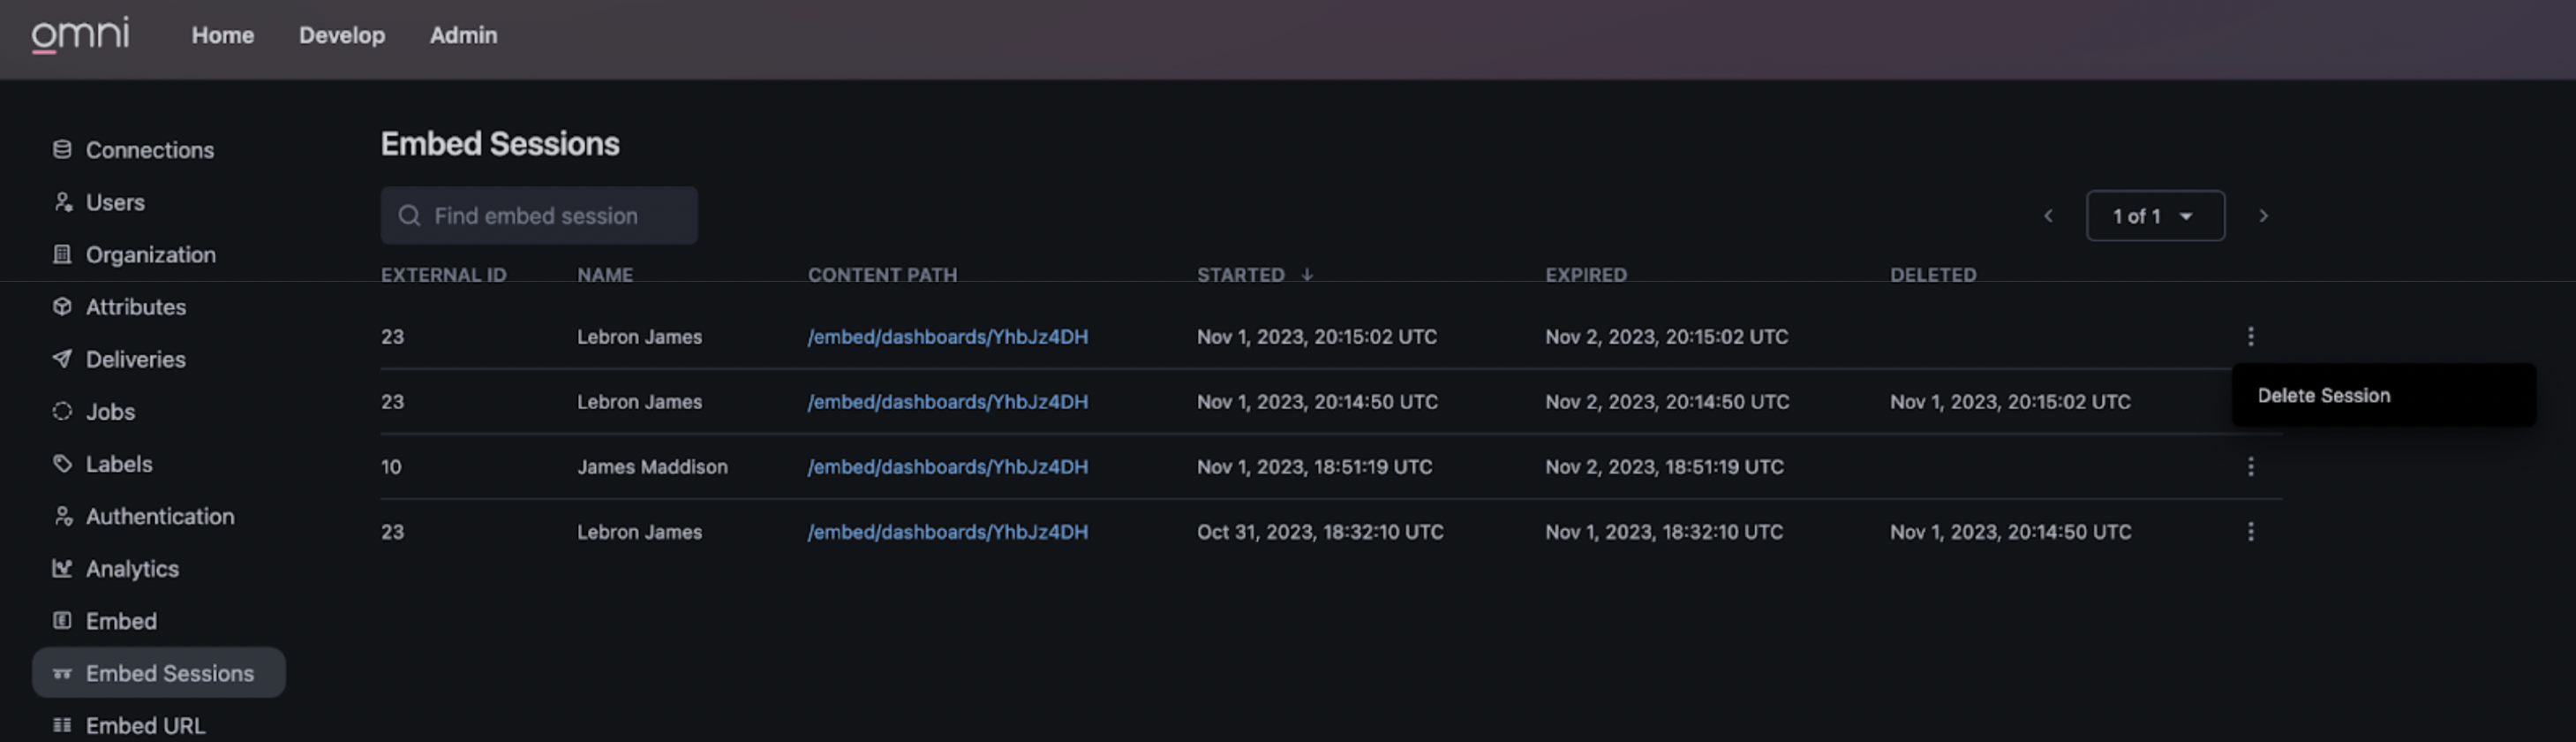
To manually delete a session, click on the options button (i.e. the vertical three dots button) to the right of the session to open the options menu. Then press “Delete Session”.
You can also filter sessions based on user name. Simply type a search string in the input above the sessions table.
Safari, Mobile Safari and Mobile iOS Chrome Support
Omni currently uses cookies to manage it's authentication sessions. When embedded in iframes, browsers like Safari view these as third-party cookies. By default, Safari takes a privacy-minded stance on these cookies and blocks them, effectively blocking access to Omni content.
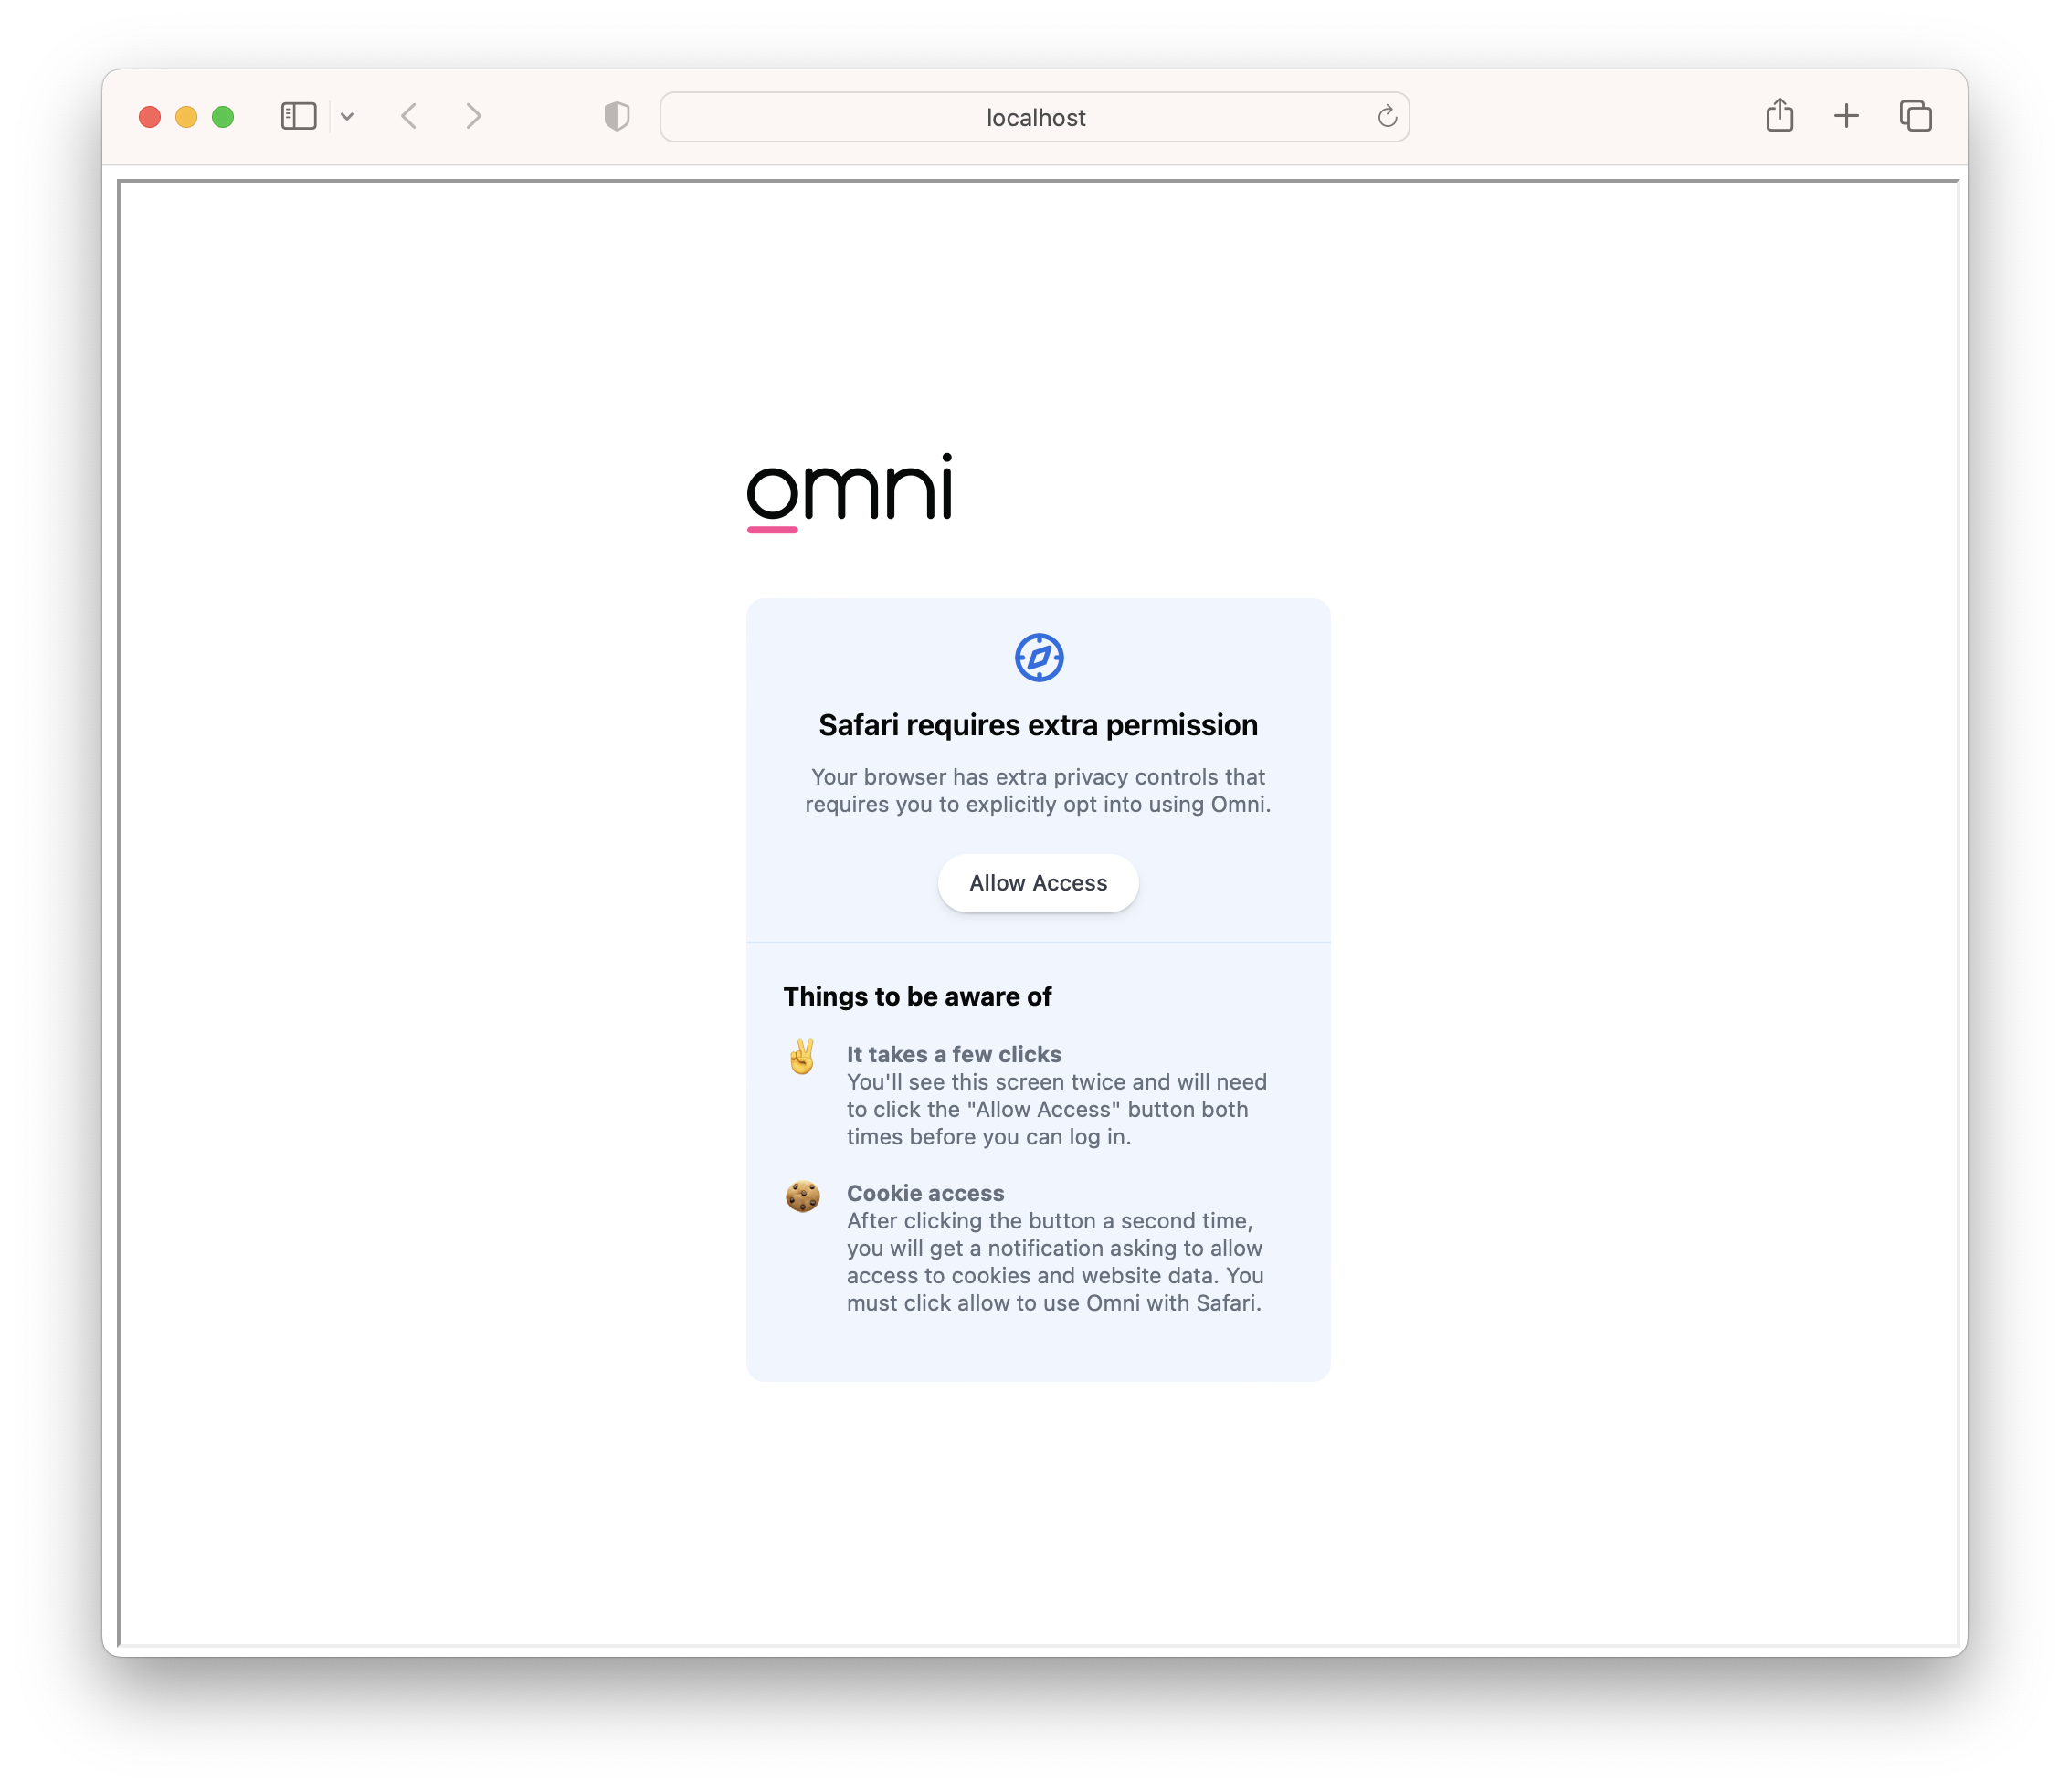
Safari provides a complicated meet-and-greet handshake to enable third-party cookies in supported contexts. This requires explicit action by the user. The steps are:
- Attempt to load the Omni dashboard. If cookies are not permitted display, a button that, when clicked, will send the user directly to the Omni instance being embedded.
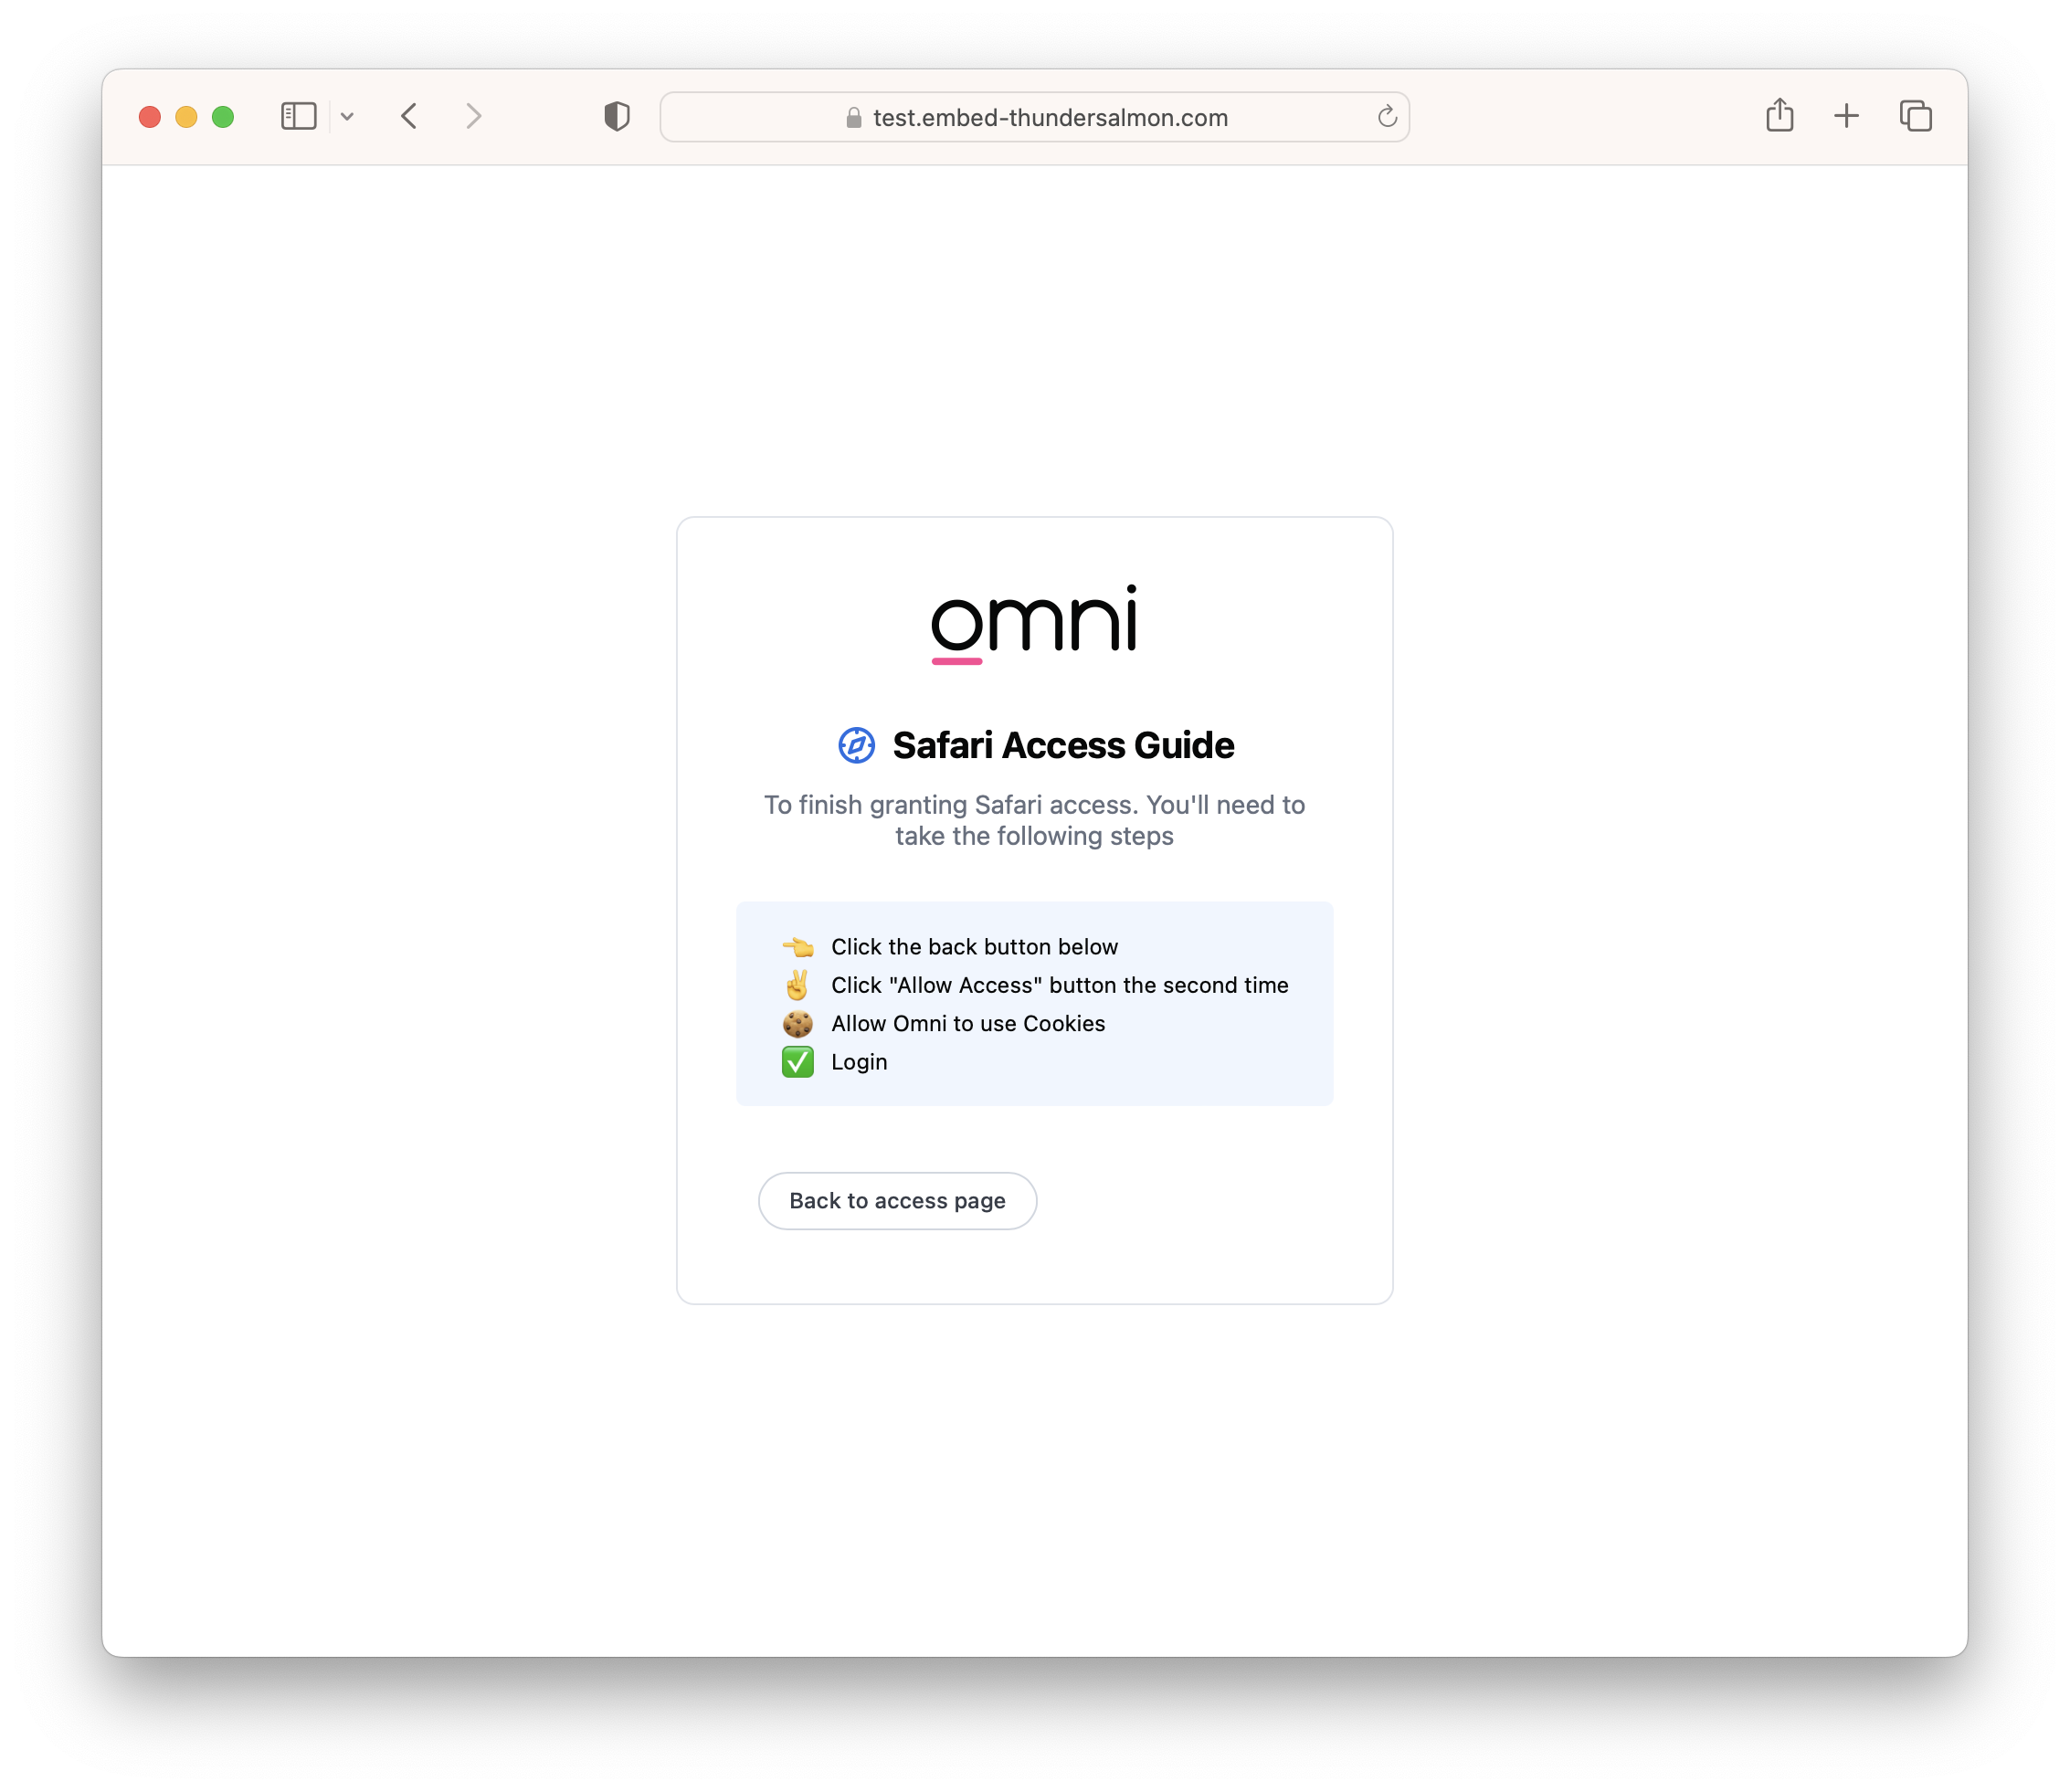
- Once the embedded Omni instance has been visited in a non-embedded context, send the user back to the embedded context.
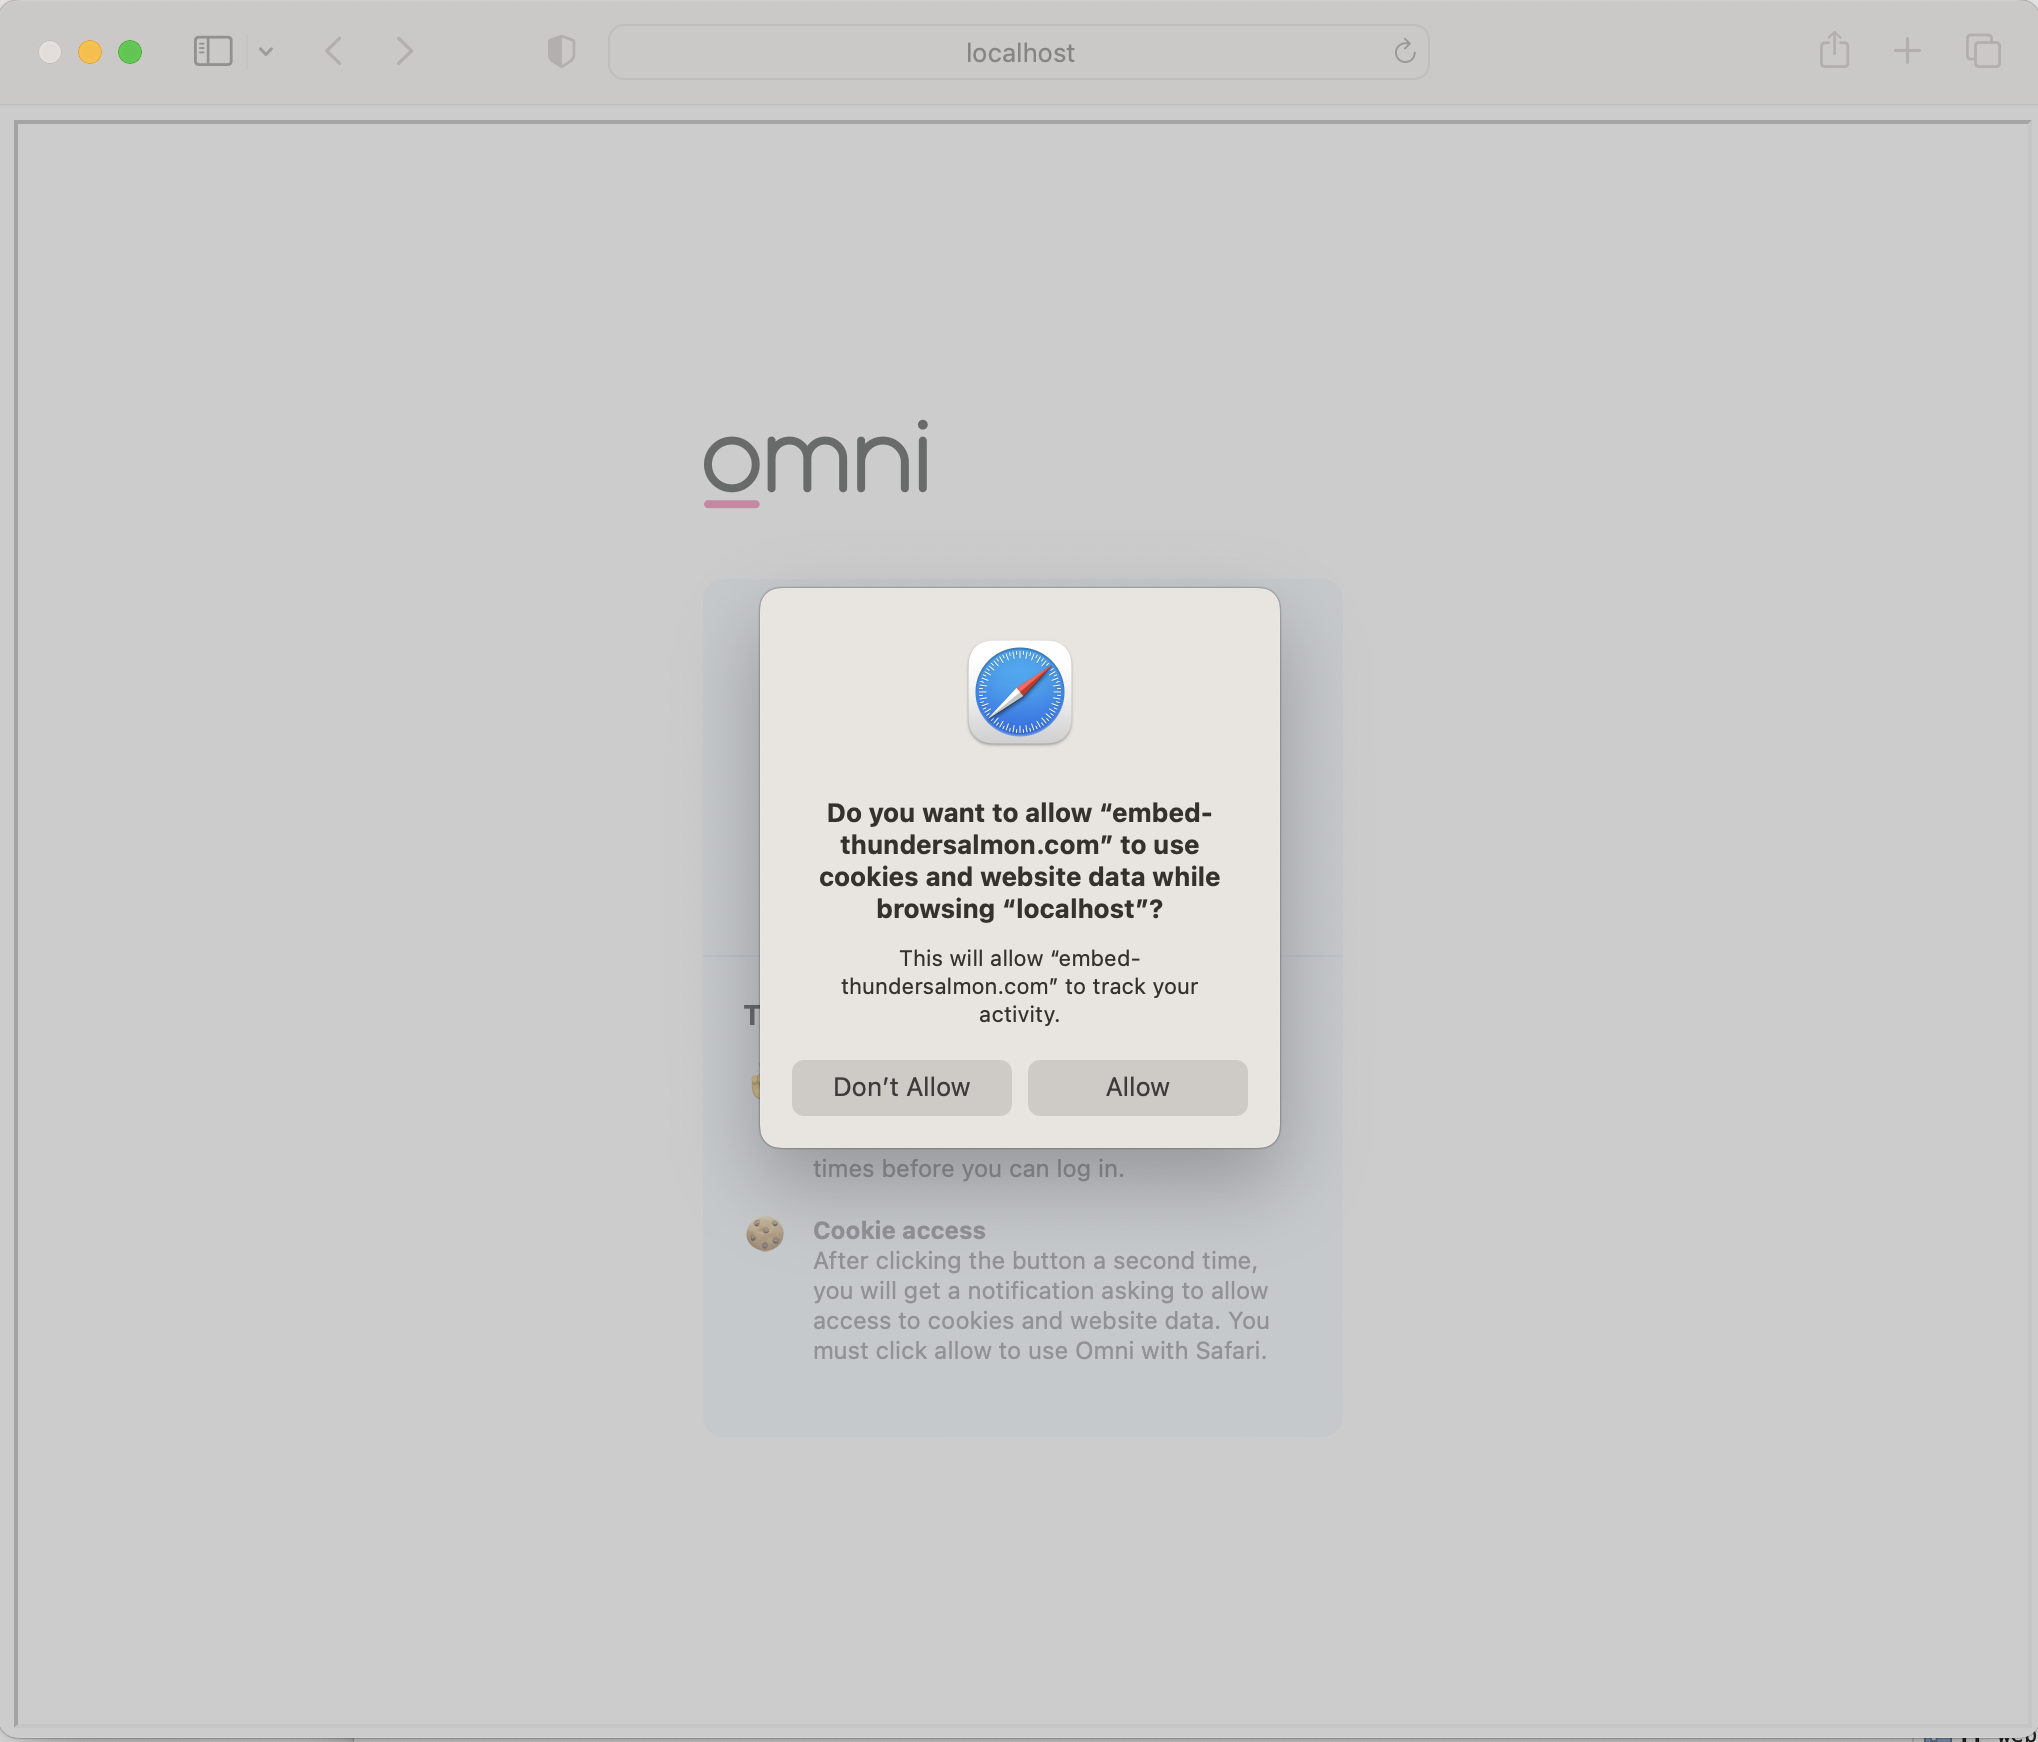
- Present the form again which will now prompt the user to allow access to "use cookies and website data". Clicking "Allow" will then redirect again, and display the embedded dashboard.
This process should only be required the first time a user accesses embedded content in Safari. Occasionally Safari may ask the user to authorize access again, displaying the form the user must click on.
The steps look like the following:
Step 1 - Visit Embed URL, Click "Allow Access"
Step 2 - Visit embedded site directly, click "Back to access page"
Step 3 - Just as in step 1, Click "Allow Access"
Click "Allow"
And you're in!
Current Limitations
- Session length - At the moment, using a valid embed url will create an embed session that lasts 24 hours. That embed session will be unusable after 24 hours. Visiting a new, valid embed sso url at any time will create a new session.
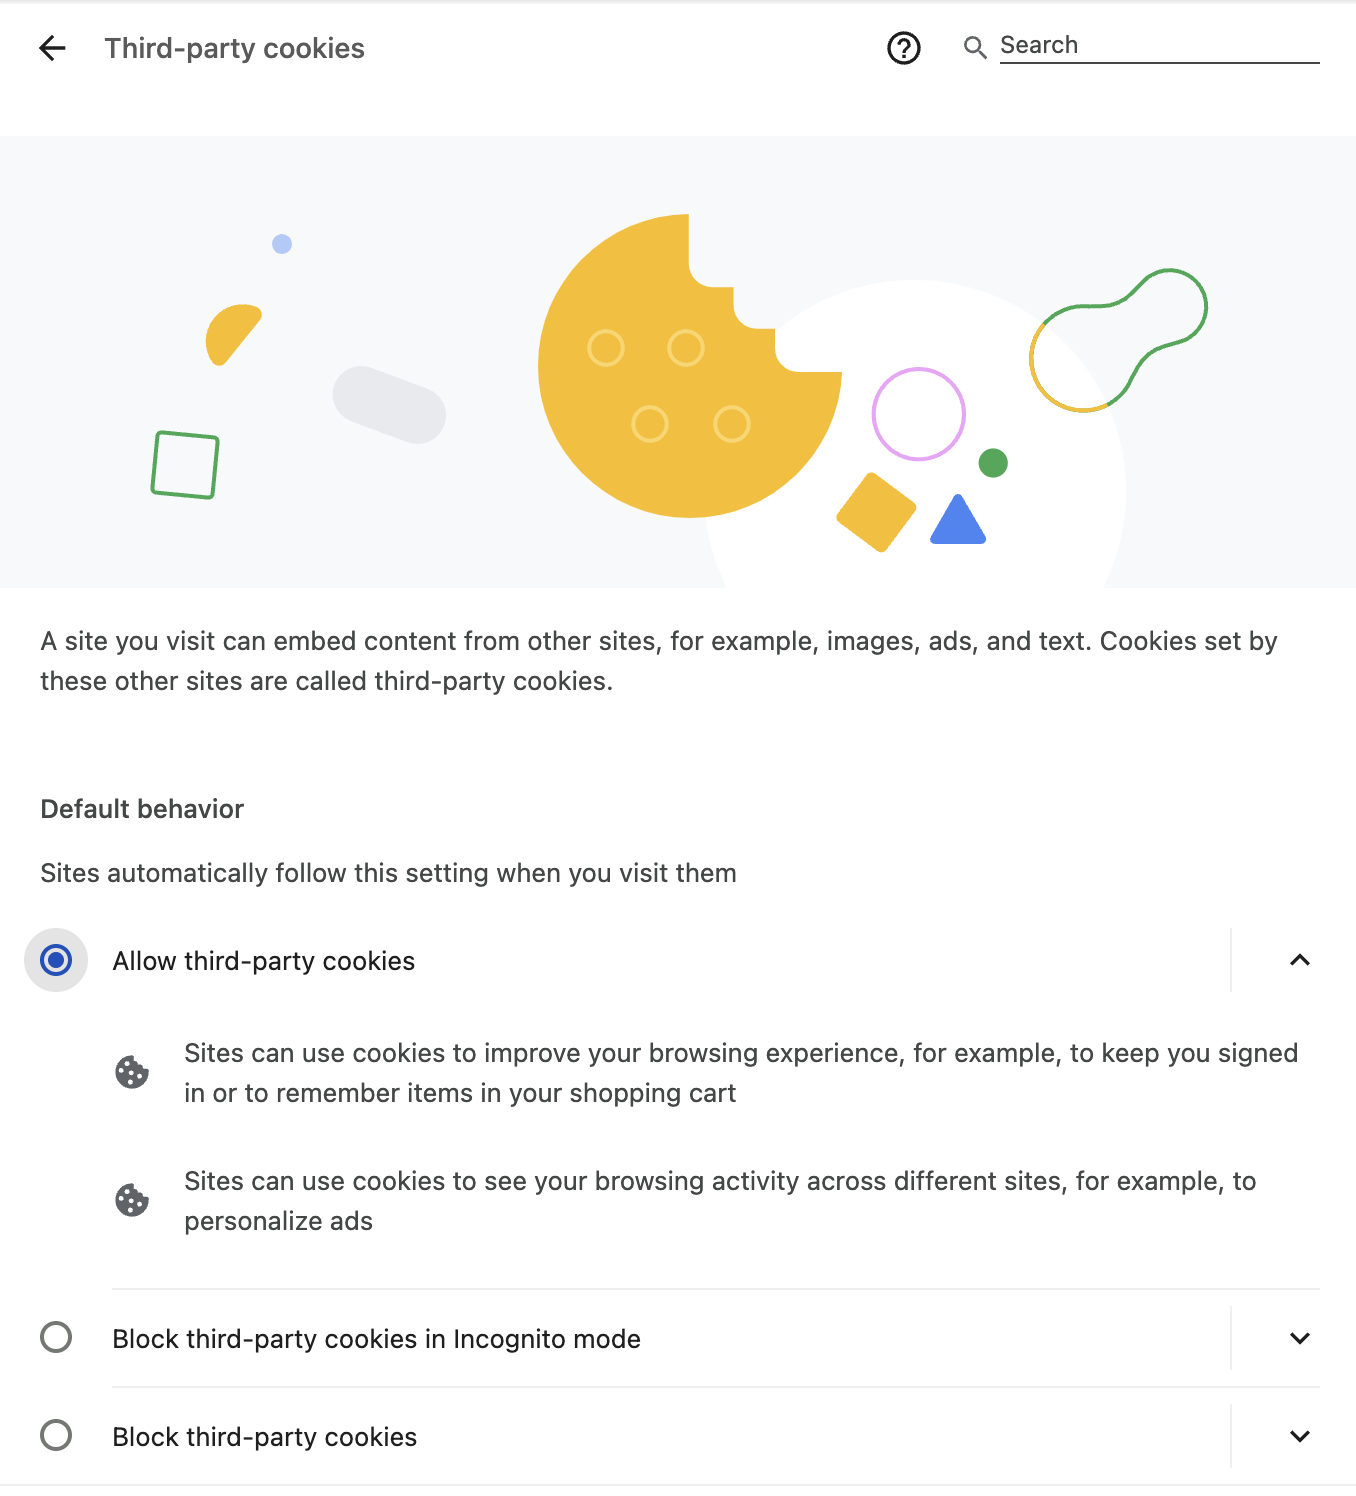
- Incognito Chrome - Incognito chrome requires allowing 3rd-party cookies. These can be found under Chrome > Settings... > Privacy and Security > Third-party cookies. Then set the option to Allow third-party cookies.